
Facebook Groups have become a great way to connect with people. And Meta added a new feature that allows you to upload any type of file to your Facebook Group.
Through Facebook groups, you can easily share and connect with people who share the same interest as you. You can share your stories, create events and connect with people.
It is easier for group admins to share their knowledge or some important files in the group. This new feature in Facebook groups is helpful, especially for businesses, schools, and organizations to share important files.
So, how do you upload a file to a Facebook group? As per Facebook’s guidelines, uploading a file to a group only takes a few clicks. Here is a step-by-step guide on how to upload files to Facebook groups in 2022.
How To Upload A File To A Facebook Group Using A Computer?
Follow these steps to upload a file to a Facebook group on a computer.
Step 1: Open your web browser and visit facebook.com
Step 2: Enter your username and password and log in to your account.
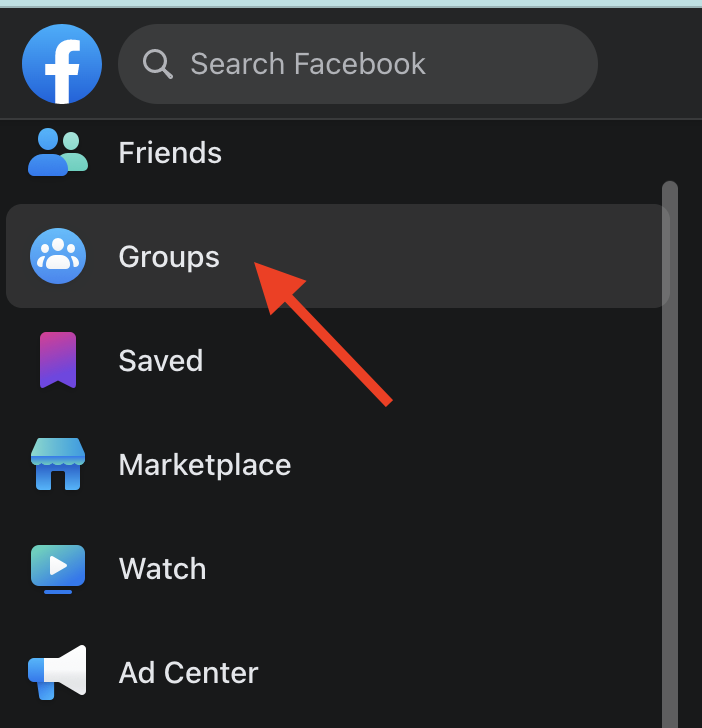
Step 3: In your Facebook News Feed, click Communities (Groups) in the left menu and choose your group. If you can’t see Communities (Groups), click See more.
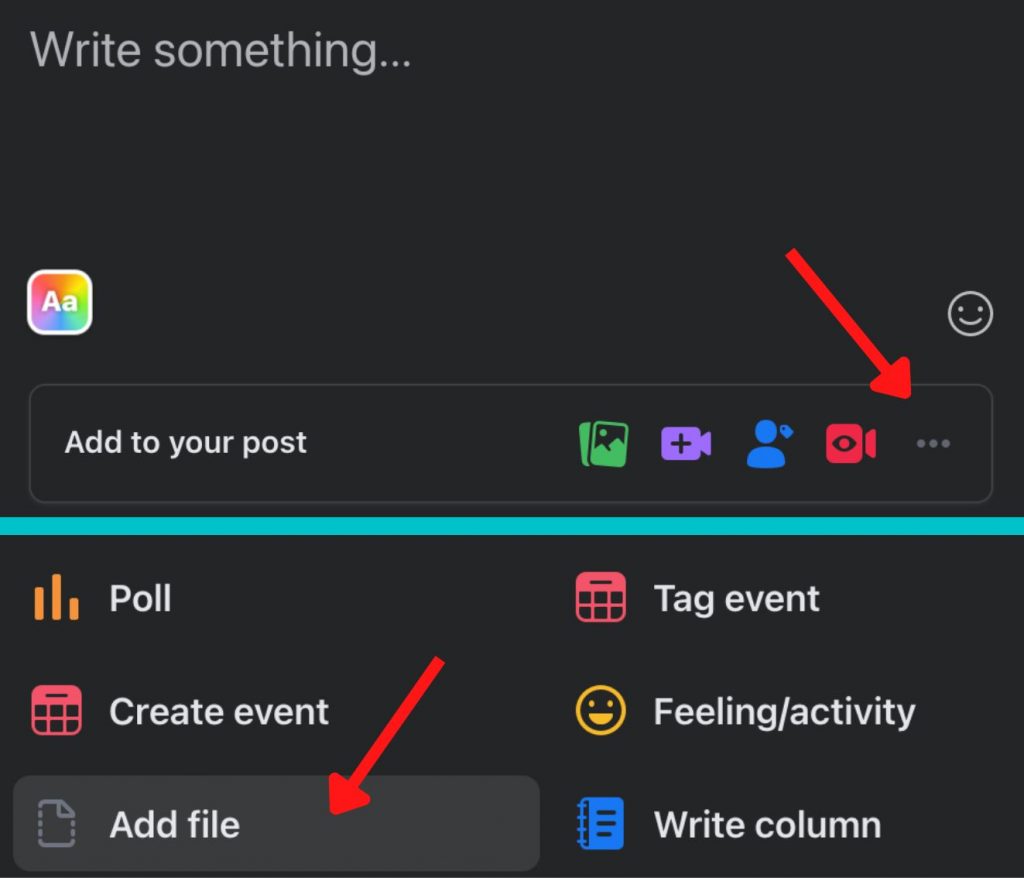
Step 4: Find and click the “Write Something…” on your group page. Click (more options) and then select “Add File.”
Step 5: Click “Choose File” and select a document or any file type you want to upload from your computer, then click the “Open” button.
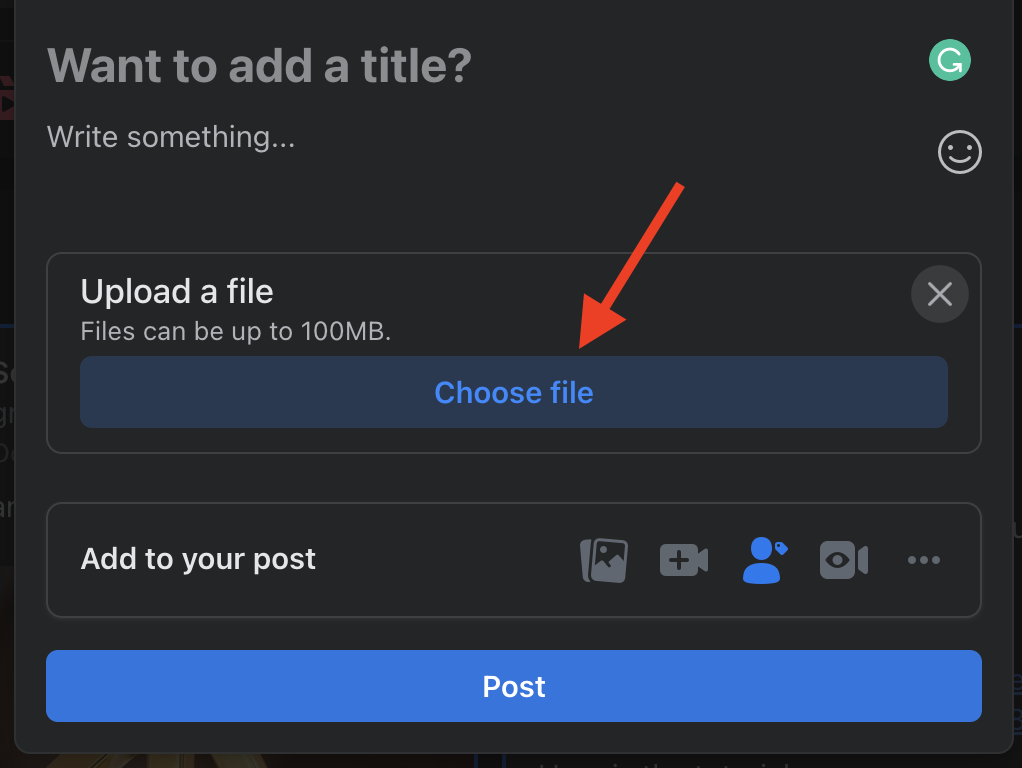
Step 6: Write something about your file, and then click Post.
How To Delete A File In Facebook Group?
Only the file uploader and group admins can delete the file in the Facebook Group. Follow these steps to delete a file in the group.
Step 1: Click Communities (Groups) on the left side of your News Feed and choose your group. Click See more if you don’t see Groups.
Step 2: Find and click Files. If Files isn’t there, click More and then select Files.
Step 3: Click the (three dots) beside the file you want to delete and then click “Original Post.”
Step 4: In your original post, Click the (three dots) next to the post, then choose “Remove post” and select “Confirm.”
Note: Keep in mind that links from Dropbox files can be shared outside the group.
Users in a Facebook group can view, upload, and download files depending on the group’s privacy policies.
You can even upload a file to a Facebook group using an Android or iOS device.
Frequently Asked Questions About Uploading and Deleting Files to Facebook Groups
1. How to Find the File Tab In The Facebook group?
To find the files tab in the Facebook mobile app, open your Facebook app, and on the top right of Facebook, tap the hamburger menu (three vertical lines), then tap “Communities (Groups),” then select your group. Below the group’s name, swipe left and then choose Files and Tap.
2. What File Formats Can Be Posted in Facebook Groups?
You can upload any file type (png, jpg, xlsx, doc, pdf, etc.) except for program files (.exe) and audio files (.mp3)
3. How To Update The File In A Facebook Group?
To update your file in the Facebook Group:
1. Find the post where you uploaded the file.
2. Click the button that says “upload revisions.” You’ll get details on the file, including all changes.
3. Click the button that says “upload new version.”
4. Choose your file and click “upload.” The file is now updated.
4. How to Upload Files to Facebook Groups Using a Phone?
To upload files from your phone to Facebook:
1. Open the Facebook app and tap the hamburger menu (three horizontal lines) in the top right corner.
2. Then tap “Communities (Groups)” and choose the specific group.
3. Once inside the Facebook group, locate the Files tab. Along the menu below the group’s name, swipe to the left and click “Files.”

4. Tap the + button, which will prompt you to select the file you wish to upload from your phone.
5. Once you have selected the file, add a short description of the file and click “Post.”
Final Thoughts
I hope this answered your question about how to upload a file to the Facebook group. Now, it will be easier for you to upload important files with your group members.
While Facebook may limit uploads for personal pages to photos, videos, animated GIF files, and web links, you have other ways to share PDF files with friends. That is by uploading to a Facebook group.
What are you waiting for? Share your files with your group and connect with people!