
Does your Facebook group have a lot of content that needs organizing? Or do your new members need a more seamless onboarding experience?
Let’s check out Facebook Units. This article covers how to create units in a Facebook group.
No doubt, the world of social media is undergoing massive changes, and people are getting more organized in their regular interactions. Especially, Facebook offers advanced features every other day.
Facebook Units are the talk of the town among Facebook group admins these days. To deliver your target market the best user experience and stay ahead of your competition, having these social learning units in your Facebook Group is essential. If you run a Facebook Group and wish to optimize a unique experience for your group members, you can never ignore this exciting feature.
Are you curious about how to create units in a Facebook group? You must understand what Facebook Units are. Let’s begin!
What Are Facebook Group Units?
Facebook Group Units are also known as the “Social Learning Units.” Admins have the option to add this feature to their Facebook Group. It is typically used to:
1. Leverage the group as an advanced platform to deliver a great online learning experience to the members.
2. To keep the content organized inside the group.
Working on this feature allows people to create “Units” that can be used to add content. The admins can create a menu in each unit and use them to provide a seamless service to the group members. Members can also mark their units’ completion, which is tracked in the “Group Insights.”
Before setting up the units for your group, there are a few prerequisites. Initially, the admins must head to the “Edit Group Settings” desktop and change the group type to Social Learning. This will add a units tab to the group, and after you have set up a single unit, you can change the group type whenever you want and continue to access this feature.
Importance of Facebook Group Unit
Setting the right group type is essential to improving the growth and engagement of a group. This is because the user alignment will directly align with the available features of a group. It is also essential to clarify the group’s purpose at the beginning. Highlighting the group’s purpose will allow the prospective members to decide if they should join it or not.
Now that you have created the Facebook Group, it is essential to organize it in an order so that people would get the information quickly and the group fulfills its purpose.
Using Facebook Units will be a good step in this regard. Some reasons why Facebook Units are necessary in groups are:
- These units allow the admins to create modules where they define the group rules for all those who are willing to join. The members can find the desired information and decide the steps they should take next.
- The group admins can decide the pattern of posts and choose the order in which they appear.
- Some groups are created to enlighten the members and receive feedback. The units allow admins to track members who have completed the training guides. The admins can view this in their Insights.
Following the members, details and their insights will help the group admins to make informed decisions about future posts. They can see details on each member’s completion and decide how to make them productive for the other group members.
How To Create Units In Facebook Group in 2022? A Step-by-Step Guide!
If you are unsure how to create units in a Facebook group, don’t worry; it is not that difficult; there are specific steps you have to follow to create these Units. Below is a step-by-step method to succeed at this task:
1. Create a New Facebook Group
Select the CREATE link in the blue bar at the top, and create a Group by following the step-by-step instructions. You can keep your group a secret, closed, or public.
2. Open The Facebook Group and Add the Guides Feature
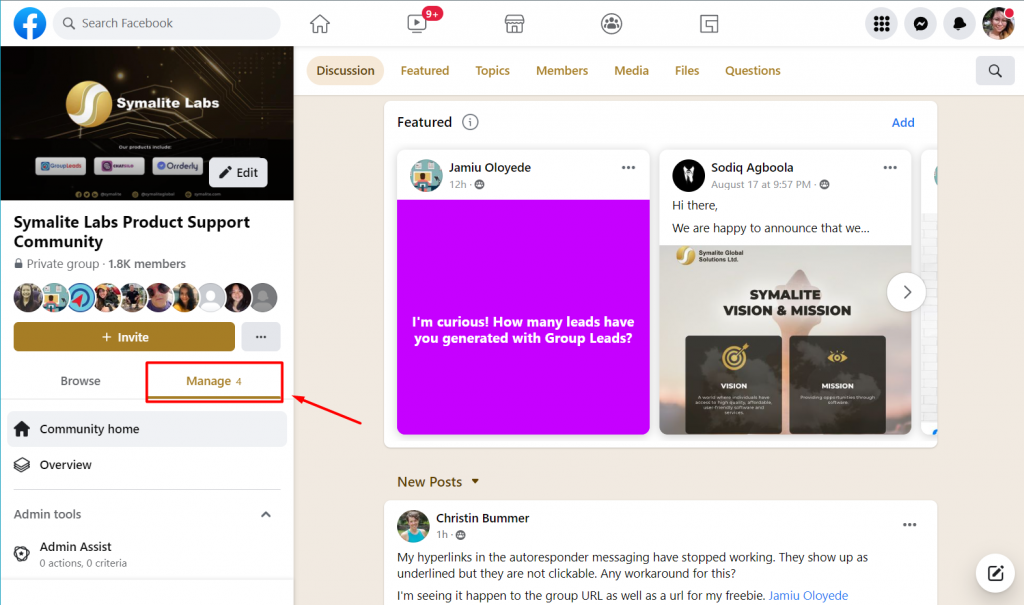
Within the Facebook Group, click the “Manage” button under the Cover Photo and scroll down to “Add features.”
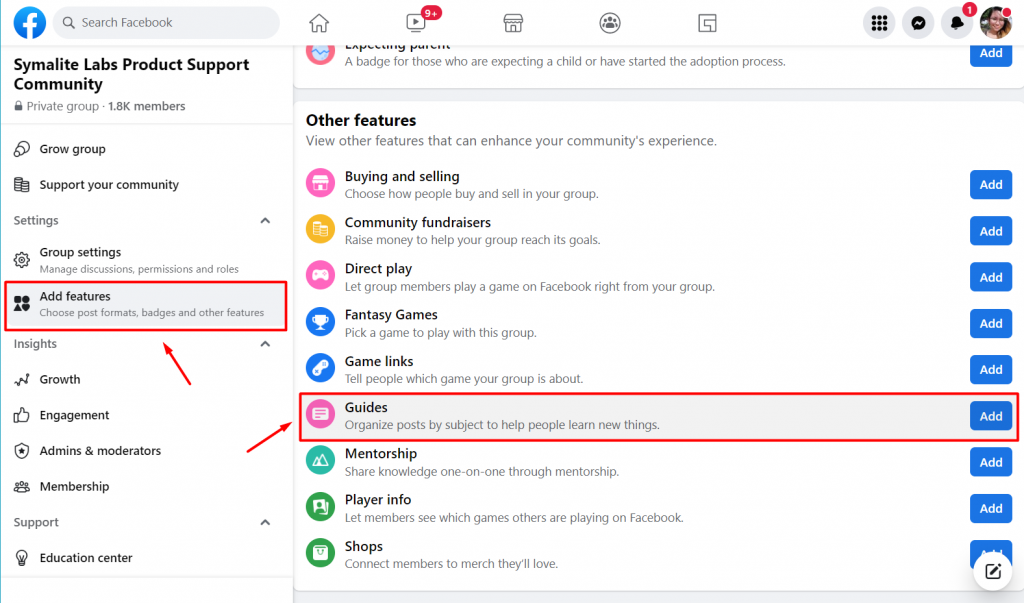
3. Click On “Guides” Under The Facebook Group Cover Photo
Head back to the main group feed or the “Community Home” and click the “Guides” button on the top of the screen.
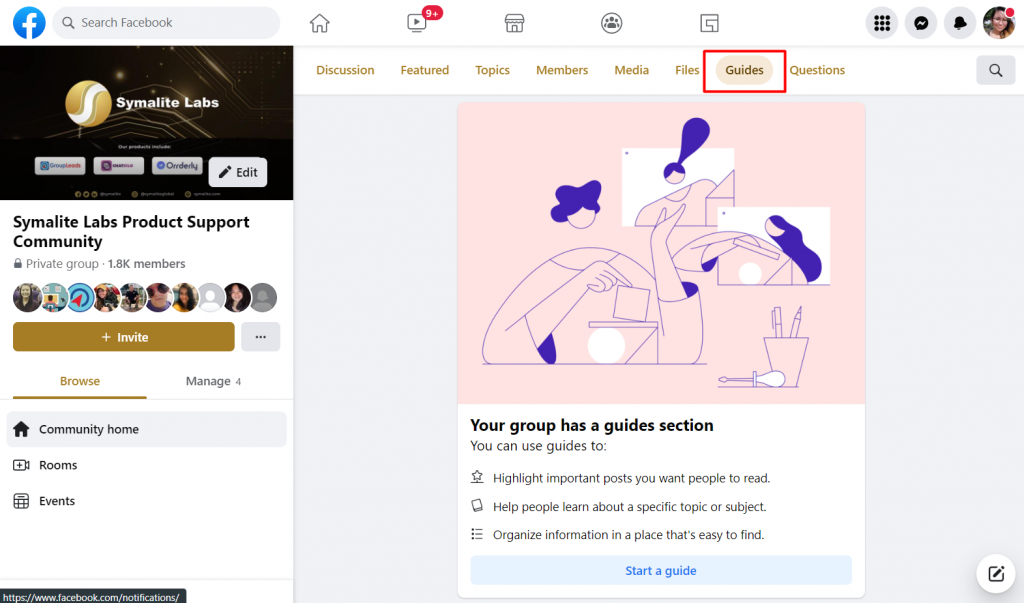
You can now start creating units in the Facebook Group and add content to each. The units and the content within them can be modified anytime, and you can reshuffle the order after adding them.
4. Specify The Purpose Of The Guide
Admins can use these guides to highlight the critical posts they want members to read, allow people to learn about a specific subject, or organize information in one place for people to read.
5. Add Name And Description To The Guide
The next step is to name and describe the guides. This is to inform the members about the units and help them find relevant guides. You can add content to the units by following two methods: by publishing a post directly in the unit or by adding an existing post to a group unit.
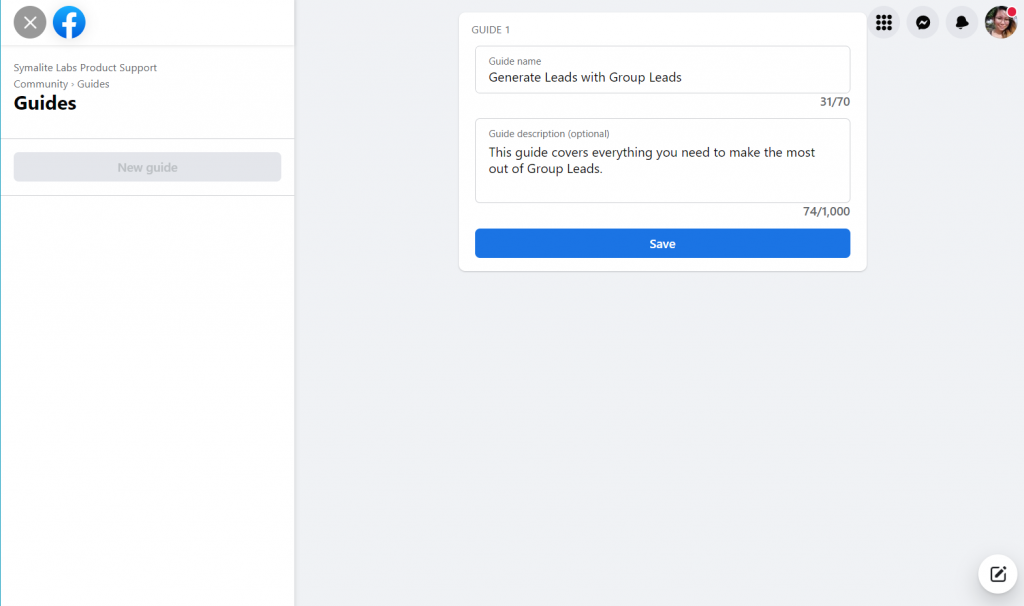
6. Click On “Save” Group Guide
Don’t forget to save the Guide to ensure its permanence in the group.
This is the easiest way of creating Facebook Group Guides. If you have been running Facebook groups for some time now, you might know that Facebook guides were previously called “Facebook Units.” If you have decided to create Guides for your Facebook Group, gathering all the relevant information about existing tools and trends is essential.
For instance, using products like Group Leads will help the admins manage the members’ data and ensure the effective running of the group. When searching for how to create units in Facebook groups, you should also find the best tools to make this task easier. Group Leads is a Google Chrome extension allowing you to generate leads from new members to your Facebook group.
From the members’ approved questions, you can transfer the group member’s email, member name, member location, workplace, and other central and minor lead details to your Google Sheets, Group Leads dashboard, and your CRM or email marketing software.
Managing members’ information inevitably requires diligence and constant effort. Accomplishing this task and keeping tabs on members’ details will help the group admins to generate fruitful guides for their audience.
Final Thoughts: How to Create Units In A Facebook Group
Managing a Social Learning Group on Facebook that is always on the learning front is daunting.
However, as an admin, if you want to learn how to create and maintain a robust group, you can also seek the assistance of virtual tools to improve your field progress after knowing the basic steps of creating such group guides.
All you need to do is make multiple groups by keeping the abovementioned strategies following the formal gathering of members’ data. When the group successfully provides valuable information to the members, they will stay hooked on it and keep expanding its reach! And that’s what your ultimate goal is.
How was today’s blog article? Got the answer to your question? If you need further help, feel free to join our exclusive Facebook group. We are here for you.