
Facebook group settings refer to the various configurations that group admins can adjust to control the functionality and privacy of a Facebook group.
These settings provide a range of tools and options for group administrators to moderate and customize their groups. As an administrator, you can control the group’s privacy settings, membership approval process, posting permissions, and more.
Using these tools effectively and providing clear guidance to members can help your group achieve its goals and foster a positive and inclusive culture. In this article, you will learn about every setting in Facebook groups and other new features. Let’s get started.
Things to Consider When Selecting the Right Facebook Group Settings
When selecting the right Facebook group settings, several things must be considered to ensure that the group meets its intended purpose and provides a positive experience for its members.
Here are some factors to keep in mind:
Purpose and Goals of the Group
Considering the purpose and goals of a group when selecting settings is an essential aspect of group dynamics and can help the group function more effectively.
When selecting settings, you should have a clear understanding of what the group is trying to achieve. Ask yourself questions like; What is the group’s primary focus? What are its goals? What are the expectations of the members? Getting answers to these questions will make you choose the proper settings for your group.
Audience or Members You Are Targeting
Consider the target audience for the group, including factors such as age, location, interests, and level of engagement. This can help determine membership settings and posting guidelines that will be most effective for the group’s audience.
Privacy
Determine the level of privacy you want for your group. Decide whether the group should be accessible to all users or limited to specific audiences. This can help to ensure that the group is inclusive and welcoming to all members. You can choose from public, closed, or secret groups.
Public groups are open to anyone on Facebook, closed groups require membership approval, and secret groups are not discoverable and require an invitation to join.
Moderation
Consider the amount of moderation required to maintain a positive environment in the group. This includes whether or not to enable post-approval and designate moderators to help manage the group. Determine who will be responsible for moderating and enforcing the group rules.
Group Size
Group size can impact the most appropriate settings to use. A small group may work well in a private room, while a larger group may need a bigger space, such as a conference room or outdoor space. Also, a larger group may require more moderation and stricter posting guidelines to manage the content volume and ensure that the group stays on topic.
Communication Needs
Consider the group’s communication needs, including the frequency and type of notifications members should receive. This can help to keep members engaged and informed about group activities and discussions.
The Needs and Preferences of the Group Members
Understanding the needs and preferences of the group members can help you select a setting that is comfortable and accessible for everyone. It’s essential to create a group that meets the needs and preferences of its members.
By considering these factors, group admins can select the best Facebook group settings to serve the group’s and its members’ needs. It’s essential to regularly review and adjust these settings as the group evolves and its needs change over time.
Where to Find Facebook Group Settings
Facebook group settings are found on the platform. Here’s how to find Facebook group settings on desktop and mobile.
To find Facebook group settings on your desktop, follow the steps below:
1. Go to the Facebook website and sign in to your account.
2. Navigate to the group you want to manage and click on it.
3. You’ll see a menu on the left side of the page. Click on “More” at the bottom of the menu.
4. Select “Edit Group Settings” From the dropdown menu.
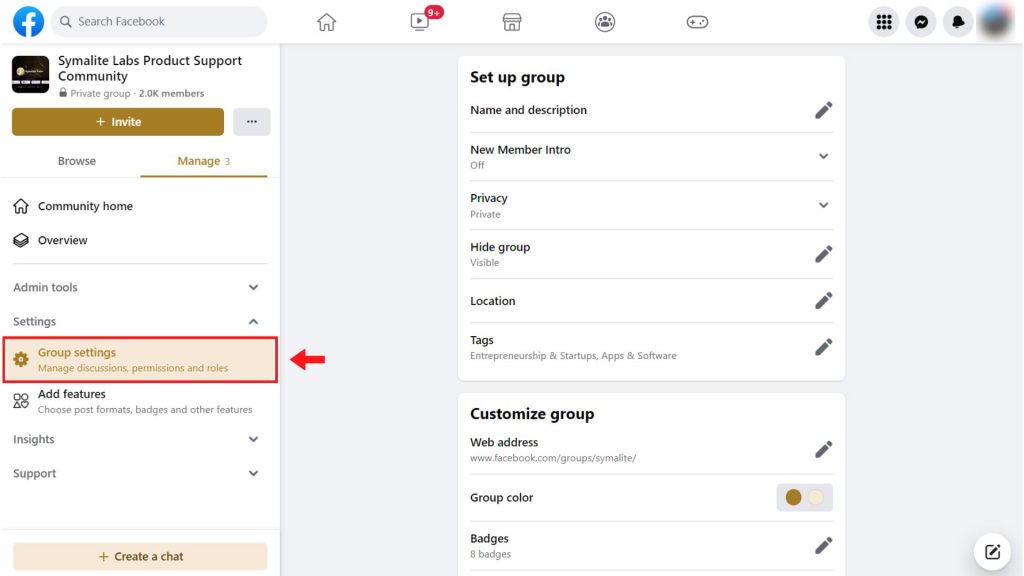
5. You’ll be taken to a page where you can manage your group’s settings, including privacy, membership approval, and notifications.
To find Facebook group settings on mobile, follow these steps:
1. Open the Facebook app on your mobile device and sign in to your account.
2. Navigate to the group you want to manage and tap on it.
3. In the top-right corner of the group page, tap on the three dots icon.
4. From the dropdown menu, select “Edit Group Settings.”
5. You’ll be taken to a page where you can manage your group’s settings, including privacy, membership approval, and notifications.
Note: The steps may vary slightly depending on your device and the version of the Facebook app you have installed.
Setting Up a Facebook Group
Here are the basic details involved in setting up a Facebook group:
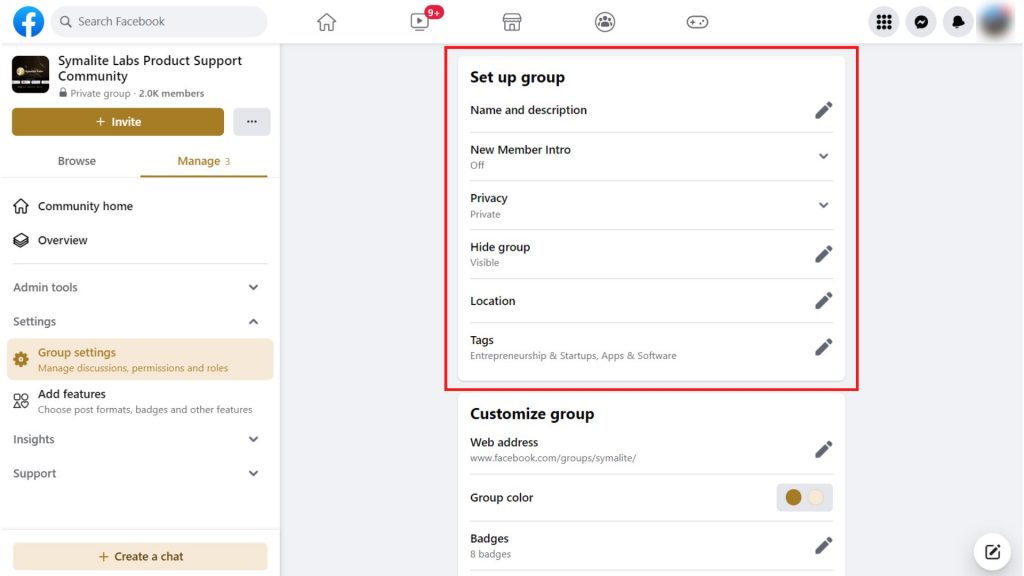
Name and Description
The name and description of a group represent the group. It is the first thing people see when they come across your group. The name and description setting on a Facebook group allow group administrators to set the group’s name and provide a brief description of what the group is about.
The group’s name must be clear and concise, and it should accurately reflect the purpose or topic of the group. The description should provide additional details about the group, including its purpose, rules, and guidelines.
To edit the name and description of a Facebook group as an administrator, you can go to the group’s settings and click the Edit symbol beside “Name and description.” From there, they can select “Name” to change the group’s name and “Description” to edit the description.
It’s a good idea to periodically review and update the name and description to ensure they remain relevant and accurate.
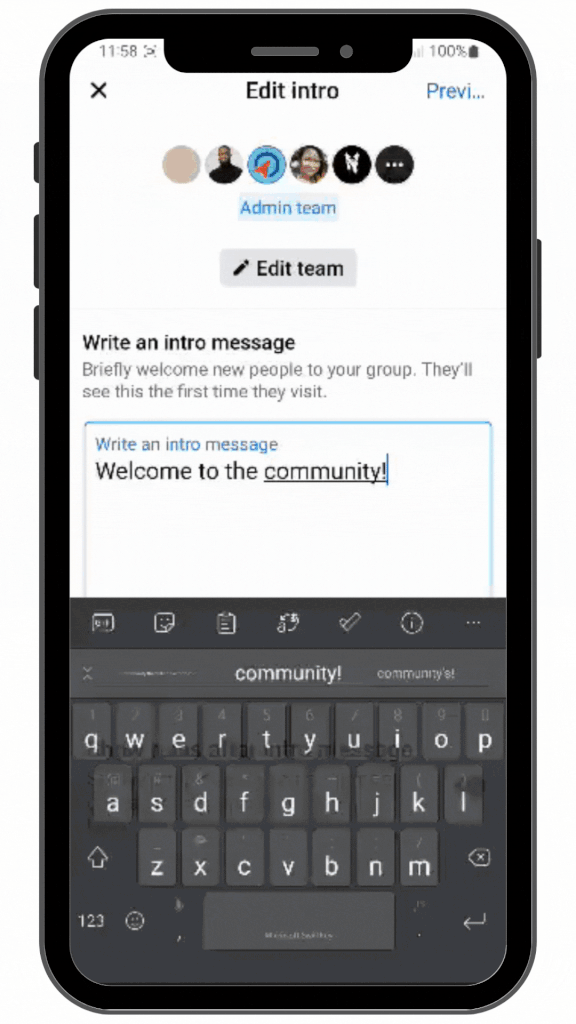
New Members’ Intro (New Feature!)
The new member intro is part of setting up your Facebook group. If you are an admin of a Facebook group, the New Member Intro feature can be a helpful tool for onboarding new members and creating a welcoming community.
With this feature, members get to know more about the group. Admins can create an intro message that automatically pops up when the newly accepted member visits the group for the first time.
A good intro message should give new members a sense of belonging to the group and what can be of interest to them in the group.
This introduction can include information such as the interests you share within the group, what they can post, or just simply a welcoming message. You can also decide to show your group rules after the intro message.
Privacy
Facebook group privacy settings offer much control over who can see and interact with your group’s content. It’s essential to be mindful of your privacy when using Facebook groups. Being mindful of these settings and making adjustments as necessary ensures that your group remains a safe and welcoming place for its members.
When setting up a group, you can choose whether you want it to be public or private. Public groups are visible to anyone on Facebook, and anyone can join or see the content in the group. On the other hand, private groups are only visible to members, and content can only be seen by those who are members of the group.
Note that when you make your group private, you can’t change it to a public group. This is to ensure that the privacy of the group members remains protected.
Hide Group
The “Hide group” setting on a Facebook group allows administrators to control the visibility of the group. When this is turned on, it hides the group from non-members. This can be useful in situations where the group is changing or if there are privacy concerns.
When the “Hide group” setting is enabled, the group will not appear in Facebook search results and under suggested groups, and only current members can see it. However, existing content in the group will still be visible to members who were already part of it before it was hidden.
To enable the “Hide group” setting on a Facebook group, an administrator can go to the group’s settings and select the Edit symbol in front of “Hide group” From there, they can select the “Hide group” option. The “visible” option is for anyone to find the group.
Note that the “Hide group” setting is not a permanent solution for controlling access to a group. The setting is reversible at any time, and group members can still share content from the group outside of Facebook, which can compromise its privacy.
Additionally, the “Hide group” setting does not prevent existing members from inviting new members to the group.
Location
The location setting on a Facebook group allows group administrators to specify the geographic location where the group is focused. This can be useful for groups centered around a specific city, region, or country.
When the location setting is enabled, the group may appear in Facebook search results for users in or near the specified location. Users who join the group can also see the location information and filter posts based on the location.
An administrator can go to the group’s settings to click on the Edit symbol in front of “Location.” From there, they can enter the location information.
Also, the location setting is not perfect for controlling who can join a group. Users outside the specified location may still be able to join the group, and users within the location may not be interested in the group’s topic.
Additionally, the location setting does not prevent existing members from sharing content from the group with users outside of the specified location.
Tags
The tags setting on a Facebook group allows group administrators to add tags, which can help categorize the group and make it more discoverable to users searching for groups related to specific topics.
Tags are keywords or phrases that describe the group’s topic or theme. Examples of tags might include “Education,” “Sports,” “Business,” or “Parenting.” When a user searches for a group on Facebook, they can enter a tag in the search bar to find groups related to that tag.
To add tags to a Facebook group, an administrator can go to the group’s settings to click on the Edit symbol in front of “Tags” From there, they can enter the relevant tags.
Tags are not a perfect solution for making a group more discoverable. Users may still have trouble finding the group if the tags are not specific or if there are many other groups with similar tags. Also, users may join the group based on the tags alone without fully understanding the group’s purpose or rules.
Therefore, it’s crucial for administrators to consider which tags to add carefully and to provide transparent information about the group’s purpose and guidelines.
Important Things to Do When Customizing Your Facebook Group
Customizing your Facebook group can help you create a unique space that aligns with your group’s purpose and enhances the experience of its members. Here are some essential things to do when customizing your Facebook group:
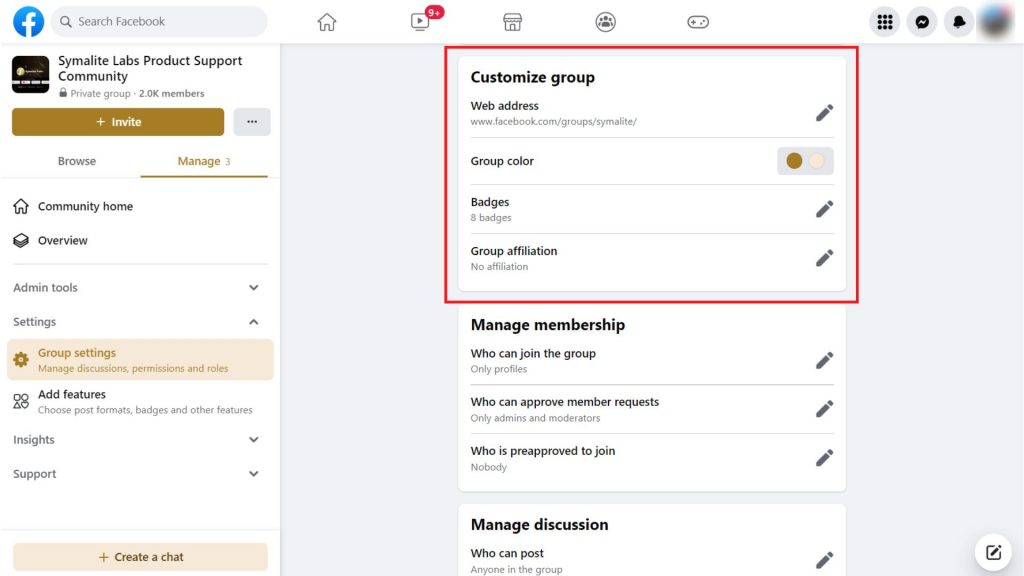
Customize the Web Address (URL)
Customizing a website’s web address or URL (Uniform Resource Locator) is vital in improving search engine optimization (SEO) and making it easier for visitors to remember the website’s address. Here are some ways to customize a website’s URL:
Choosing a Unique Vanity URL
A domain name is part of the URL after “www.” and before the “.com” or other top-level domain. In this case, the domain name is www.facebook.com. You will be adding a unique phrase at the end.
A memorable and descriptive domain name can help visitors remember the website and improve SEO.
You may add your brand name to your URL.
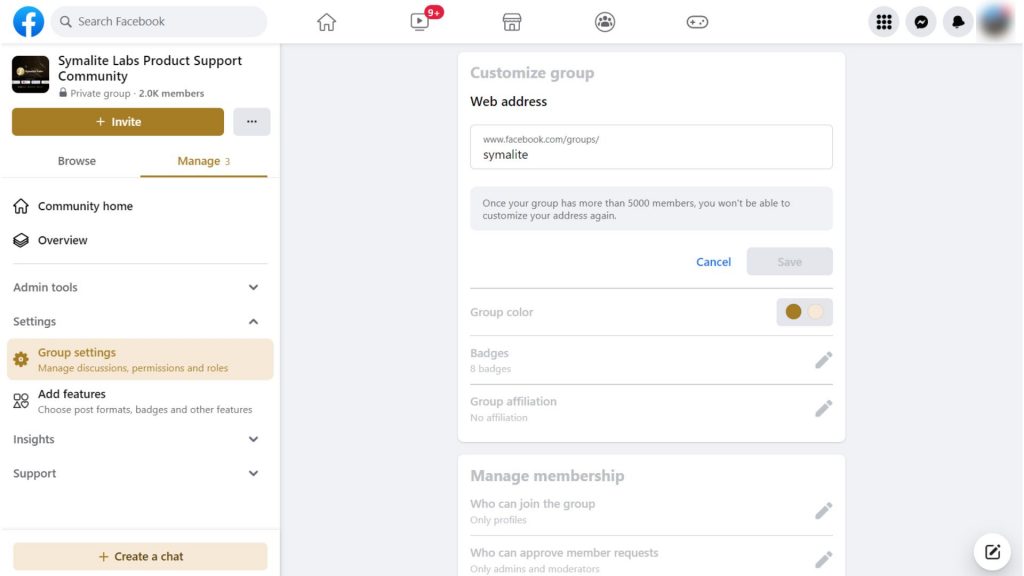
If it’s a pop-up group, you may include the specific event and the year. For example, “/content-marketing-workshop-2023.”
Using Keywords in the URL
Including relevant keywords in the URL can also improve SEO and make it easier for search engines to understand the website’s content. Make sure to keep the URL short and simple.
Using Hyphens to Separate Words
Hyphens can make the URL more manageable for humans and search engines to read and understand.
Avoid Using Numbers and Special Characters
Using numbers or special characters in the URL can make it difficult to remember and affect SEO.
Choose Color (Updated Feature!)

Choosing the right color for your Facebook group can help create a cohesive and visually appealing experience for your members. Here are some tips for choosing colors on Facebook group settings:
- Choose colors that align with your brand or group theme.
- Choose colors that align with the tone and purpose of your group. For example, blue is often associated with trust and professionalism, while red is associated with passion and urgency.
- Use contrasting colors for readability. For example, dark text on a light background or light text on a dark background.
- Avoid using too many colors, making the group look cluttered and confusing. Stick to a few colors that work well together.
- Consider testing different color combinations and asking for feedback from members before settling on a final design.
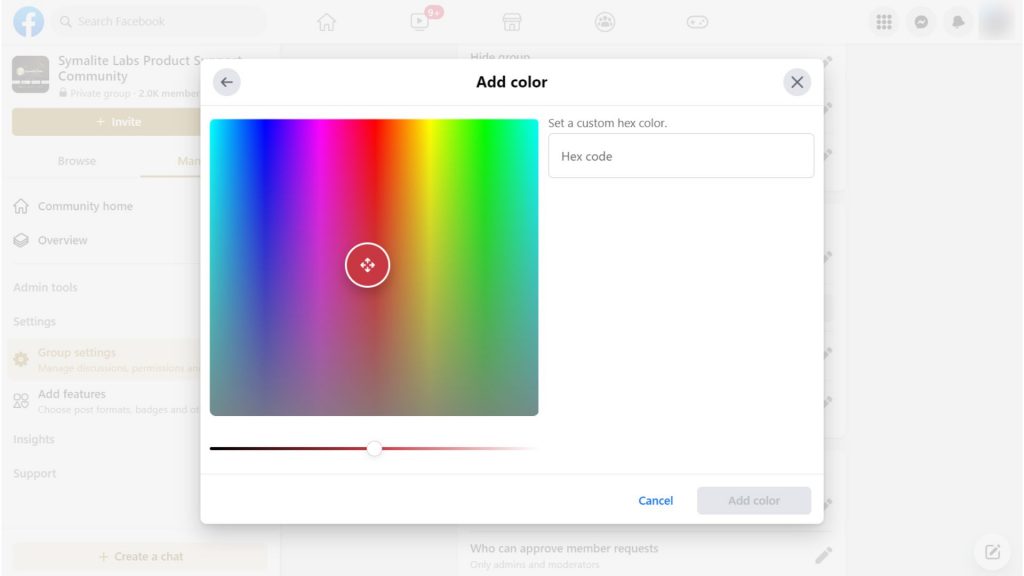
Initially, one can only choose from the default colors which are all bright primary and secondary colors. Facebook would also suggest colors based on the group banner.
Now, you can customize your color by dropping the specific hex code.
Add Badges
Adding badges to a Facebook group can help members identify themselves and their roles. Here are some tips for adding badges on Facebook group settings:
- Decide which members will have badges and what those badges will represent. Common badge categories include administrators, moderators, and VIP members.
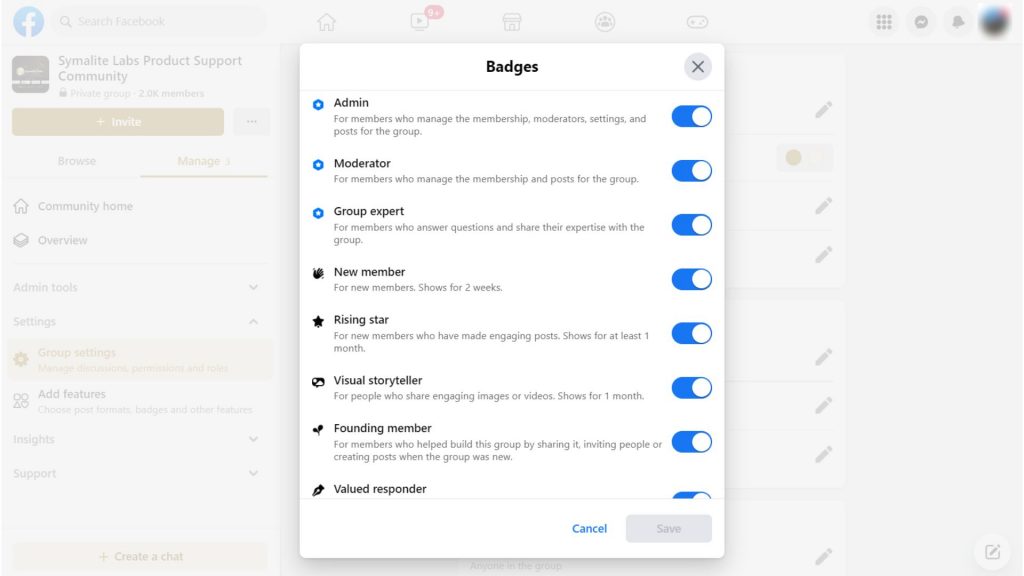
- Select icons or images that represent each badge category. For example, an icon of a megaphone can represent an administrator badge, while an icon of a star can represent a VIP member badge.
- Determine who can assign or remove badges. Usually, only administrators and moderators can assign or remove badges.
- Assign badges to appropriate members once the badges are created and permissions are set.
- Monitor badge usage to ensure members use badges appropriately and do not misrepresent themselves. Also, periodically review badge assignments and update them as necessary.
Group Affiliation
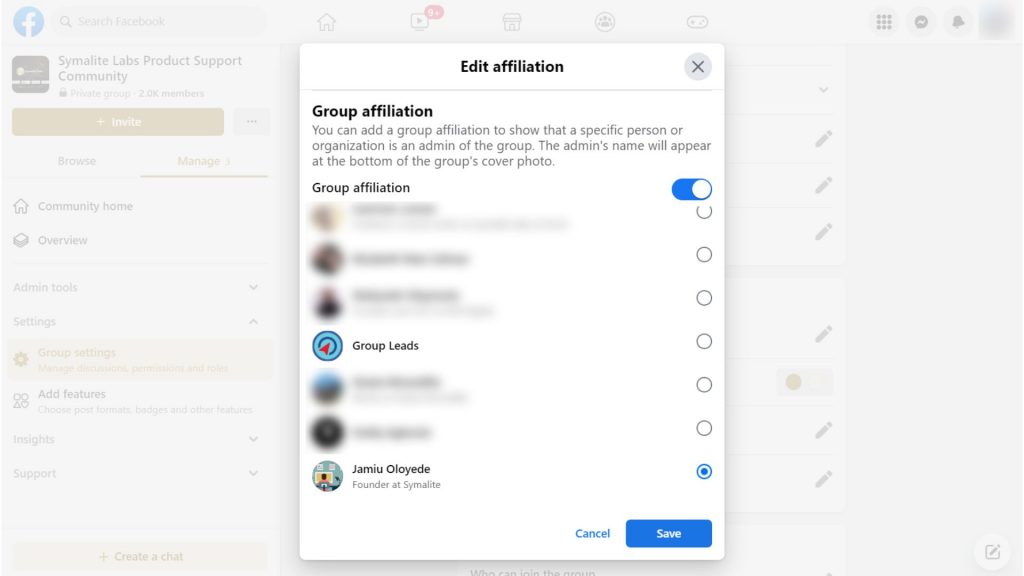
Group affiliation allows members to identify as belonging to a particular group within the larger group. This can help group members find others who share similar interests or backgrounds and can also help facilitate more targeted discussions or events within the group.
Group affiliation settings can be managed by the group’s admin or moderators, who can choose which affiliation options are available to members. This can also set particular affiliations as “exclusive,” meaning members can only select one affiliation at a time.
Admins and moderators can also see which members have selected which affiliations, which can help with group management and member engagement.
Extra Features You Can Add to Your Facebook Group
You can add several features to your Facebook group to enhance its functionality and engagement.
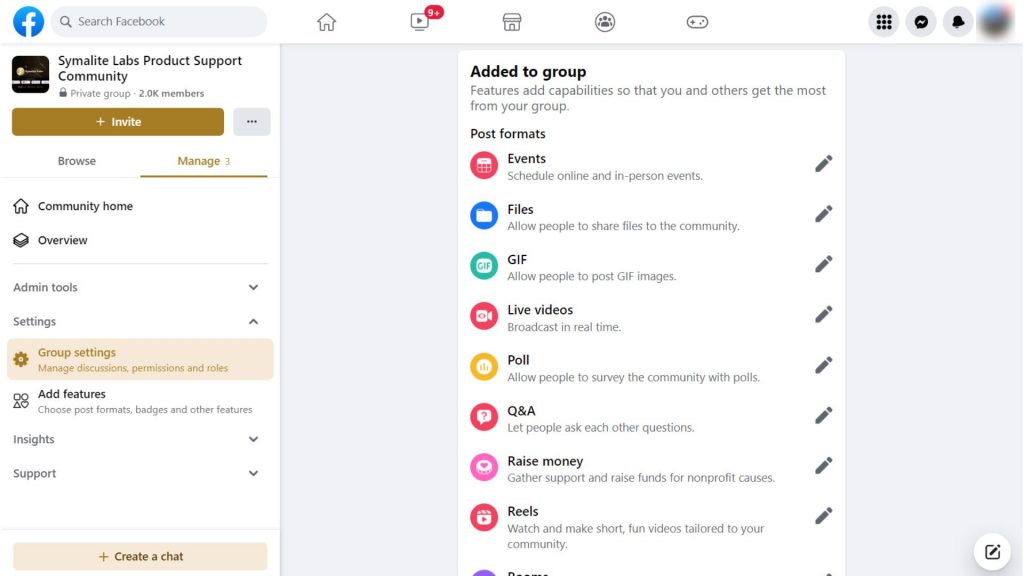
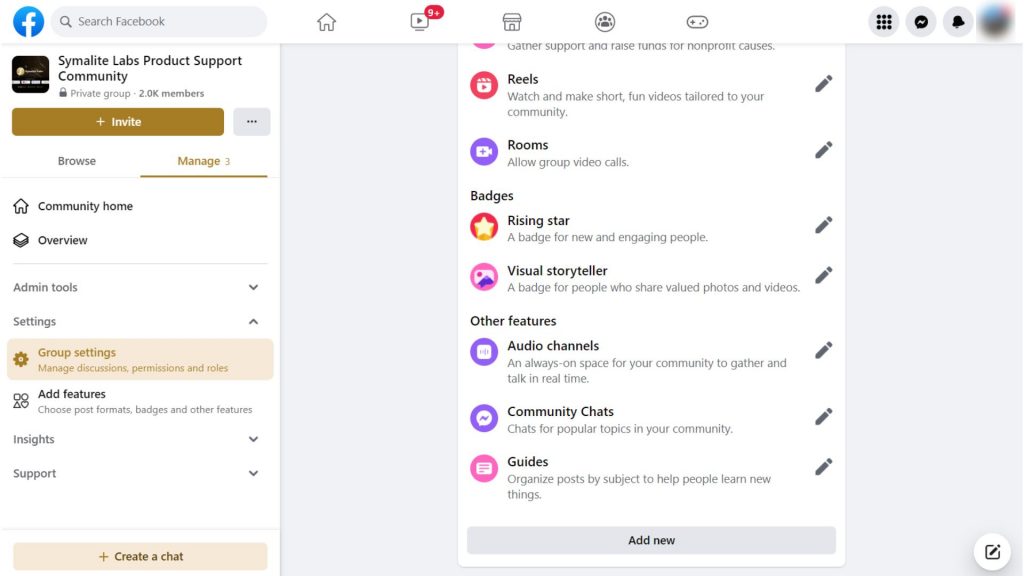
Here are some options:
Group Type
Facebook offers several group types to choose from when creating a group. Each group type has its own features and functionalities, allowing group admins to choose the type that best suits their goals and audience. Here are some of the available group types:
Social Learning
This group type is designed for educational purposes, allowing members to collaborate and learn together. Admins can create courses, manage content, and track progress.
Buy and Sell
This group type is designed for buying and selling goods or services. Admins can set up transaction rules and guidelines, and members can post listings and communicate.
Jobs
This group type is designed for job seekers and recruiters. Admins can post job openings, and members can apply for jobs or post their job listings.
Gaming
This group type allows gamers to connect and share their gaming experiences. Admins can create events, post updates, and manage discussions related to gaming.
Facebook Group Rooms
Rooms are a feature in Facebook groups that allows members to have private, real-time conversations with each other. It helps enhance engagement and communication within a Facebook group, providing members a private and real-time space for discussions and collaboration.
Group admins and moderators can create Rooms within the group, which can be used for various purposes, such as brainstorming sessions, virtual meetings, or social gatherings.
They can set the Rooms as open or closed, depending on the privacy needs of the group.
Open rooms allow any member to join, while closed rooms require an invitation from the admin or moderator.
The Admins and moderators can also invite or remove members, mute or unmute participants, customize the Room settings, and delete the room altogether.
Rooms are integrated with Facebook Messenger, allowing members to participate in the conversation from either the group or the Messenger app.
Members in a Room can share their screens, making collaborating on projects or discussing visual content easier.
Guides
Guides (formerly called learning units) are a feature in Facebook groups that allows admins and moderators to curate and organize helpful information for group members.
Admins and moderators can create a Guide within the group, which can be used to provide information, guidelines, resources, or tips related to the group’s topic or purpose.
Guides can be organized into sections, making it easy for members to find and access the necessary information. Their customizable layout allows admins and moderators to choose the format and design that best suits the content. Multiple admins and moderators can collaborate on a Guide, making it easier to share responsibilities and knowledge.
Host Q&A
Host Q&A is a feature in Facebook groups that allows admins and moderators to host question-and-answer sessions with members. It is a valuable tool for enhancing engagement and communication within the group, providing members with a direct and interactive way to connect with admins and moderators.
Members can ask questions and discuss during the Host Q&A, making it an interactive and collaborative experience. The Admins and moderators can approve or reject questions, mute or unmute participants, and set time limits.
Host Q&A sessions can be scheduled in advance, allowing members to prepare their questions and make time to attend. The sessions can be focused on a specific topic or theme related to the group’s purpose or interests. It can be conducted through Facebook Live video, making it easier for members to participate and engage.
Managing Membership Options
Managing membership in Facebook group settings can help create a positive and engaging community for members.
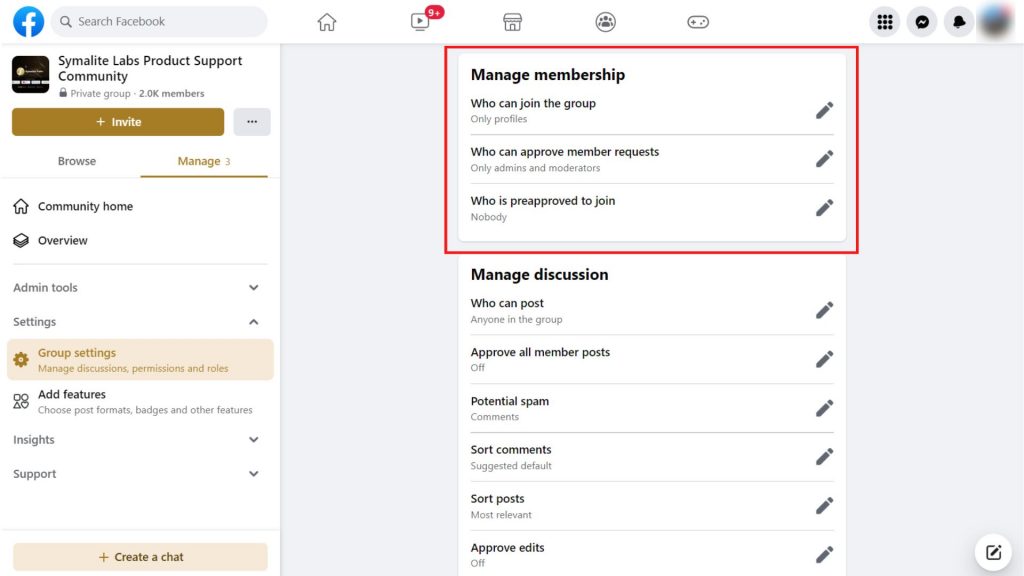
Here are the options under “Manage membership” in Facebook group settings:
Who Can Join the Group
This option is a setting that allows group admins to determine who can join their group. There are two options: “Profile and pages” and “Only profiles.”
The Profile and pages option allows both pages and profiles to join the group. While the Only profiles option allows profiles only to join.
It is crucial to consider the group’s purpose when selecting the “who can join the group” option. For example, if the group is for a specific audience or purpose, it may be beneficial to choose a more restrictive option to ensure that only relevant members are joining the group.
Who Can Approve Member Requests
The “who can approve members’ request” option is a setting that allows group admins to determine who has the authority to approve requests to join the group. There are typically two options: “Anyone in the group” and “Admins and moderators only.”
Selecting Anyone in the group means that any group member can approve requests to join. On the other hand, selecting Admins and moderators only means that only group admins and moderators have the authority to approve requests to join the group.
It is crucial to consider the size and purpose of the group when selecting the “who can approve members’ request” option. If the group is small or the admin team is limited, it may be best to choose the “Admins and moderators only” to ensure that only trusted individuals have the power to manage the group membership.
However, if the group is large or the admin team is more extensive, the “Anyone in the group” option may provide more flexibility and help distribute the workload of managing the group.
Memberships Pre-approvals
The “membership pre-approval” option is a setting that allows group admins to approve or reject new members before they can join the group. This setting can be turned on or off, typically in group or membership settings.
You can choose groups or upload a file to pre-approve membership requests for your group. The membership pre-approval will be activated when you choose groups or upload a file.
The chosen groups or emails will be pre-approved when they request to join the group. You can decide not to do any of these if you don’t want to pre-approve anybody.
Managing Discussion Options
This setting enables Admins and moderators to monitor and control group discussions and conversations.
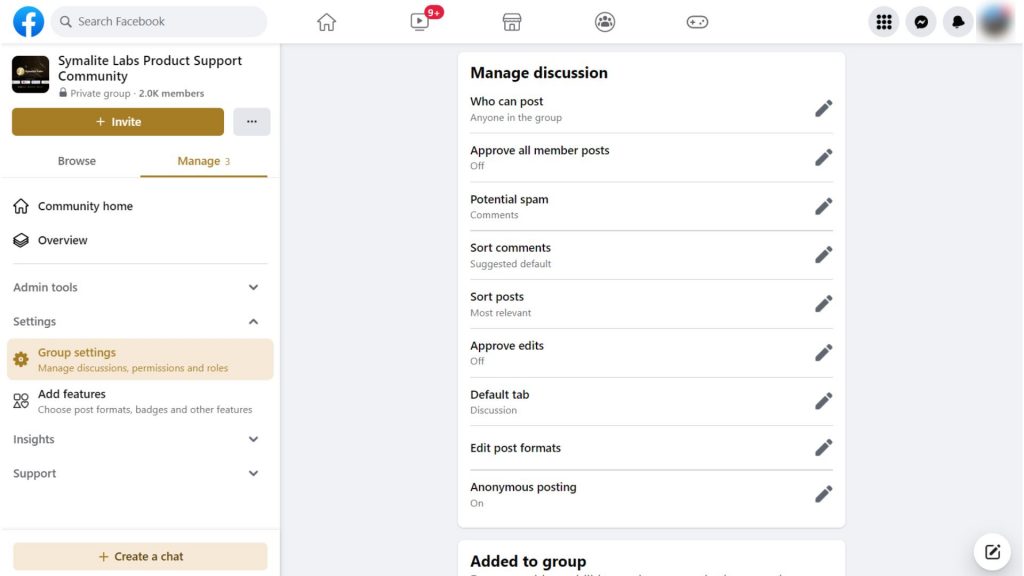
The options under this setting include the following:
Who Can Post
Here, you can choose whether you want anyone in the group to post or just the admin and moderators. Between the Anyone in the group and Only admin options, it is better to opt for the former because members and their conversations form a community.
Approving Members Post
As admin or moderator of the group, you can decide whether to approve all member’s posts or allow members to post directly to the group. When you turn on “Approve all members’ posts,” the post must be approved by admins or moderators before it can be posted to the group. When the “Approve all members’ posts” is turned off, members can post directly to the group.
Editing Approval
The Approved edits option means edited posts must be approved by admins and moderators when turned on, and members can directly edit their posts when the option is turned off.
Turning on this option is a great way to prevent spammers from adding unnecessary links to the group post.
Sorting Comments
The Sort comments option allows members to choose whether to see all, most recent, suggested default, or top comments.
Sort Posts
This option allows posts to be sorted based on the Most relevant, Newest activity, and New post.
Default Tab
The “default tab” option is a landing page that group members are directed to when they first visit the group. By default, the landing page is set to “Discussion,” which displays recent posts and allows members to converse.
Edit Post Formats
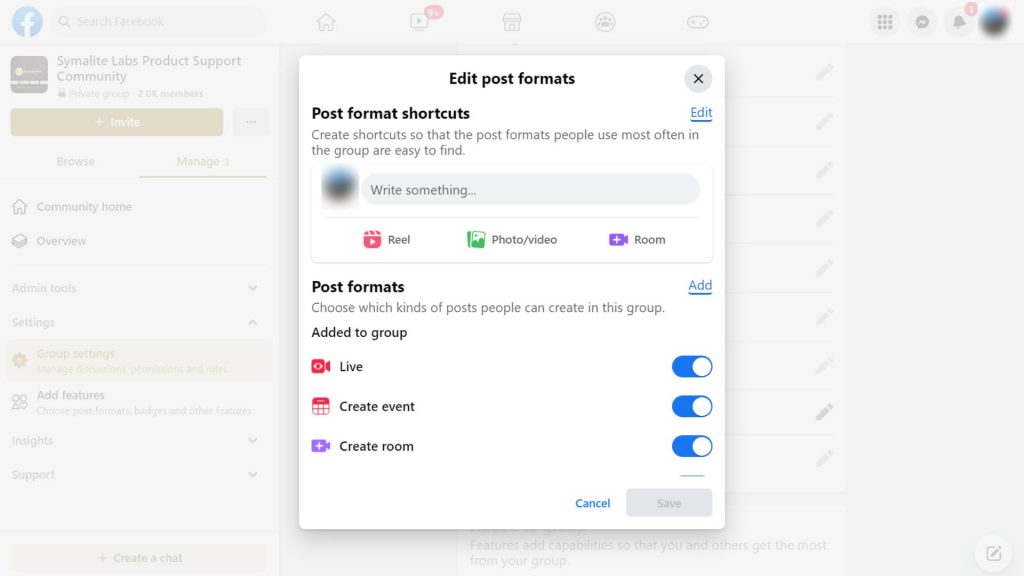
The “Edit post formats” feature allows group admins to customize the types of posts members can create. This feature gives admins more control over the content and format of posts that appear in the group.
In the “Edit post formats” settings, admins can choose which posts are allowed in the group, such as text posts, photo posts, video posts, and more.
Admins can also allow or disallow certain features within those post formats, such as polls or questions within text posts.
Anonymous Posting
The “Anonymous posting” feature allows group members to post content without revealing their identity. When a member posts anonymously in a group, their name is not displayed on the post, and their identity is kept private.
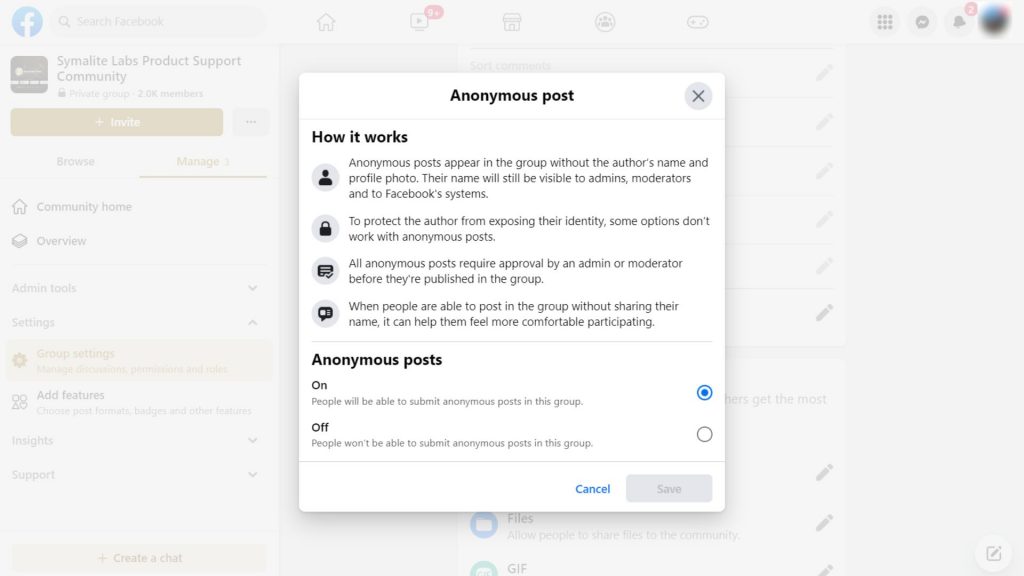
This feature is helpful in situations where members may not feel comfortable sharing their identity, such as in sensitive or personal discussions. However, it can also be problematic if anonymous posts are used to spread misinformation or harmful content without accountability.
Group admins can turn on or off anonymous posting in their group settings. If it is on, members can create posts anonymously.
Admins must consider anonymous posting in their group carefully and set clear guidelines to ensure it is used appropriately.
Potential Spam
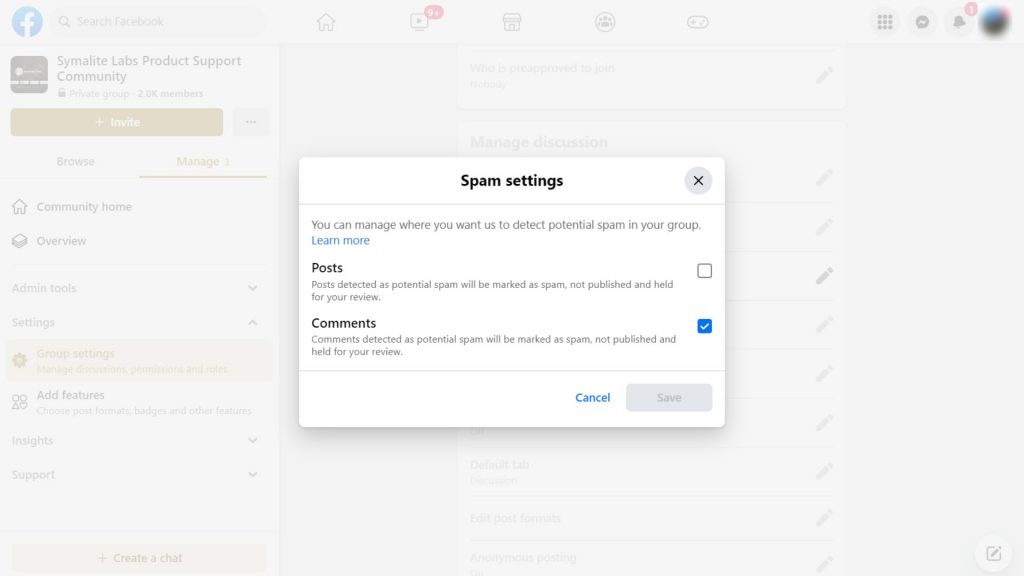
The “Potential spam” feature is a tool that helps group admins identify and manage posts and comments that may be spam or unwanted content.
When enabled, the “Potential spam” feature uses Facebook’s algorithms to detect potentially spammy content, such as posts or comments containing links to low-quality websites or reported by other users as spam.
Admins are then notified of these potential spam posts and can take action, such as deleting the post or removing the user from the group.
Admin can choose where they want the potential spam to be detected. It can be either in posts, comments, or both. This feature can help keep groups free from unwanted content and maintain a positive user experience for group members.
Managing Advanced Group Settings
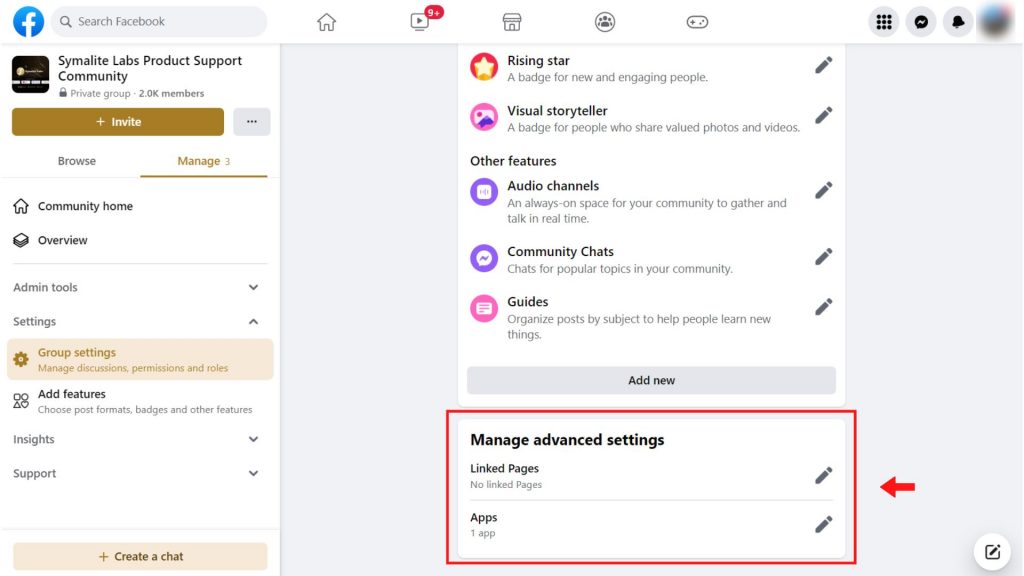
This is the last set of settings in Facebook group settings. The options in this settings are:
Linked Pages Option
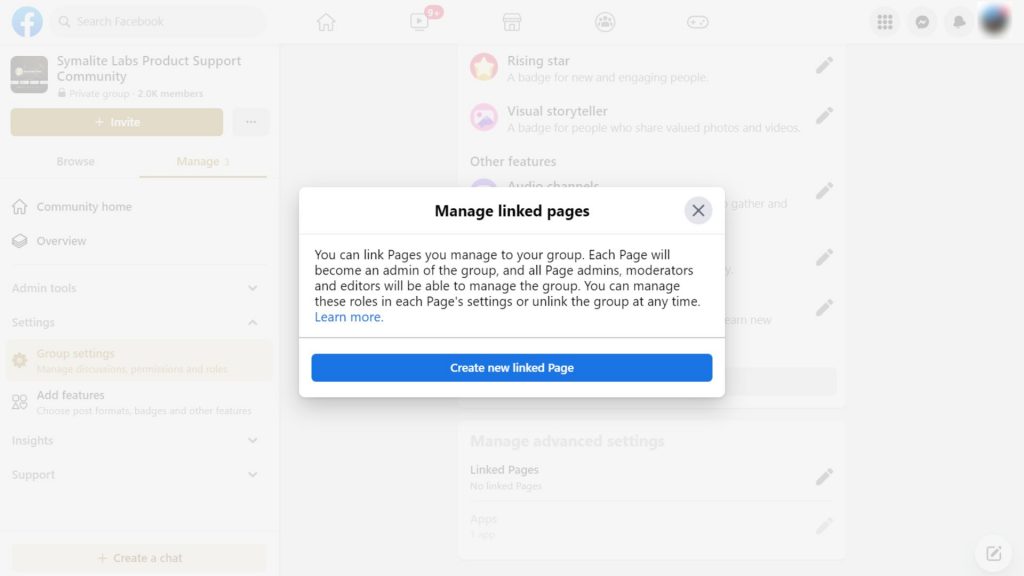
This option lets you link your group to one or more Facebook pages. It helps increase your group’s visibility and allows you to post updates that will also appear on the linked page. This helps you reach a wider audience.
Recommended Groups Option
This feature allows you to suggest other Facebook groups to your members. When you enable this option, your group members will see a list of recommended groups when they visit your group page. This can help them discover new communities and expand their network.
Add Apps Option
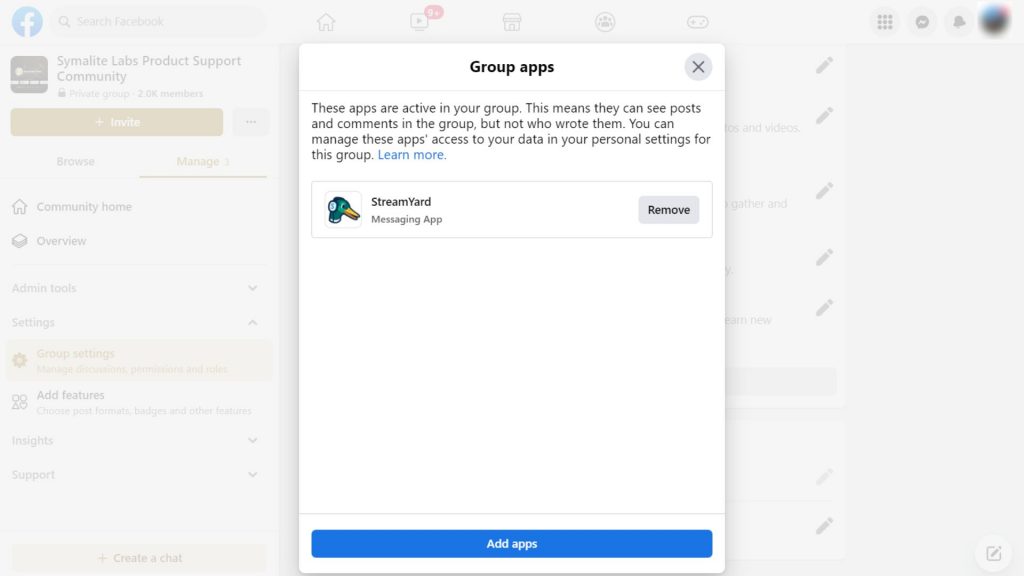
This option allows you to add third-party apps to your group. You can add apps that provide additional functionality, such as scheduling tools, file-sharing apps, or poll creators.
By adding apps to your group, you can customize it to meet the needs of your members better and make it a more engaging and productive space.
Guidance on How to Use Facebook Group Communication Tools Effectively
Facebook group communication tools can be a powerful way to keep members informed and engaged. Here are some guidelines for using these tools effectively:
Use Group Announcements
Group announcements are a great way to communicate important updates to members. Use them to share news, highlight upcoming events, or promote new content. Be sure to keep the announcements concise and relevant to the group.
Encourage Discussion
Encourage members to start discussions and engage with one another. This helps to build a sense of community within the group. Ask questions, share interesting articles or videos, and respond to comments to keep the conversation going.
Use Direct Messaging
Direct messaging is a great way to communicate with individual members or smaller groups within the larger group. Use it to follow up with members interested in a specific topic or coordinate activities with a subgroup.
Moderate Effectively
As a group admin, it’s important to moderate the group effectively to ensure members feel safe and comfortable participating. This may involve removing spam or inappropriate content or moderating discussions to prevent arguments or personal attacks.
Respond to Member Inquiries
When members have questions or concerns, it’s essential to respond promptly. This will help to build trust and engagement within the group. If you cannot answer a question immediately, let the member know you’re looking into it and will get back to them as soon as possible.
Stay Organized
It’s essential to stay organized when using Facebook group communication tools. Use calendars or scheduling tools to plan events and announcements and create templates for frequently used messages or responses. This will help to streamline communication and ensure that important information is not overlooked.
Tips for Troubleshooting Common Issues That May Arise in Facebook Groups
Here are some troubleshooting tips for common issues that may arise in Facebook groups:
Establish Clear Group Guidelines
Ensure your group has clear guidelines outlining what is and isn’t acceptable behavior. This can help to avoid problems in the first place.
Keep an Eye on the Group Regularly
It’s necessary to monitor the group to ensure everyone follows the rules. Check for inappropriate posts, comments, or behavior and take appropriate action as needed.
Address Problems as Soon as Possible
If you notice any problems in the group, addressing them as soon as possible is vital. This can help prevent them from turning into more significant issues. You may use moderation alerts and admin assist to catch signs of conflict.
Make Use of the Moderation Tools
Facebook offers a variety of moderation tools, including the ability to remove posts and ban users. Use these resources to keep your group safe and respectful.
Encourage Members to Report Issues
Encourage members to report any problems they encounter in the group. This will allow you to stay on top of any issues and address them immediately.
Communicate With Members
Be open and honest with your members about any issues that may arise. This can aid in the development of trust and the smooth operation of the group.
Seek Assistance When Necessary
If you’re having difficulty managing your group, don’t hesitate to seek assistance from Facebook or other experienced group administrators. They may have advice or suggestions to help you navigate any difficulties.
Final Thoughts
The success of a Facebook group relies heavily on the effectiveness of its settings and the dedication of its admins to create a positive and engaging community.
Facebook group settings are crucial to creating and maintaining a safe and positive online community. Group admins can control who can join the group, what types of content can be posted, and how members interact with others.
The admins need to be proactive in moderating the group, enforcing its rules, and responding to any issues that may arise. Doing so can create a welcoming environment that encourages meaningful interactions and fosters a sense of belonging among its members.
As an admin, you should acknowledge your new members by creating a welcoming intro to help them feel more comfortable and engaged. Sending personal messages to group members is also an excellent way to make them feel welcome.
Use Group Leads now to send an automated personalized message to your new members.
Not only that, Group Leads has a lot of features that can help you connect with your members effectively and efficiently.