
Getting the best out of your Facebook group requires you to master the Facebook group admin tools. Incidentally, it’s not that hard to master.
Generally, being a Facebook group admin isn’t a walk in the park. It’s hard.
There are so many areas to familiarise yourself with.
Furthermore, Facebook has incorporated more new admin features. All of them are meant to help you succeed as a group admin or group owner.
When you understand all the Facebook group admin tools within your disposal, moderating your group comes naturally.
By reading this post, you’ll learn what Facebook group admin tools are, how to find them, what each stands for and what the admin tools are used for.
Let’s get right to it.
What Are Facebook Group Admin Tools?
Facebook group admin tools are features present in a Facebook group that help lower the workload of group admins and assist them in efficiently managing their groups.
It has a label called “All Tools” when you log into your favorite Facebook group. Administrating your groups has never gotten easier.
You can do many things, thanks to the admin tools. We’ll get to how you can access these tools and how to use them soon.
Why Are Facebook Group Admin Tools Important?
It used to be hard managing a Facebook group. There are so many things to deal with every single day as a group admin.
You’ve looked at your Facebook group and realized how tough it is to maintain the community.
I get it, you’ve done the hard work of creating a Facebook group for your brand or your business like everyone advised you to do.
It’s time to steer your group to success toward growth and revenue!
You’ve seen a lot of tools readily available as you launch your Facebook group as an admin. But you have no idea which tool is used for what!
To make it all the more interesting, in 2020, Facebook started making new releases to the Facebook group admin tools. And they’ve been adding to the list of admin tools since then.
We wrote this post to make things less complicated for you to understand and use.
Although, there are several things to consider in your Facebook group. But many of them can be taken care of easily, thanks to the admin tools.
Previously, you had to consider pending members’ requests, worry about how to retrieve the members’ emails for your email marketing campaign, auto-approve or auto-decline members and much more.
Now, in an official announcement, Facebook has formally released different new admin tools for Facebook groups.
Some of them include new features to help you moderate comments more efficiently, auto-approve new members, set up membership questions to filter new members, new admin home to see all your tasks at a glance, and more.
You’re in for pleasant surprises regarding the relevance of these Facebook group admin tools to your success as a group admin.
Where Are Admin Tools on Facebook Group?
Here are the steps to follow to access the Facebook group admin tools.
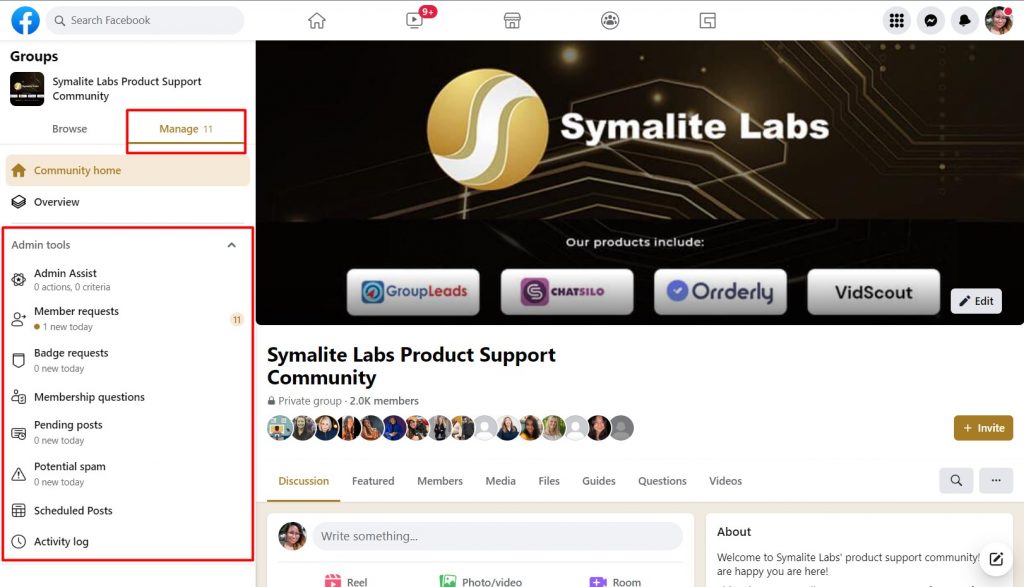
- Click the Manage icon inside your Facebook group
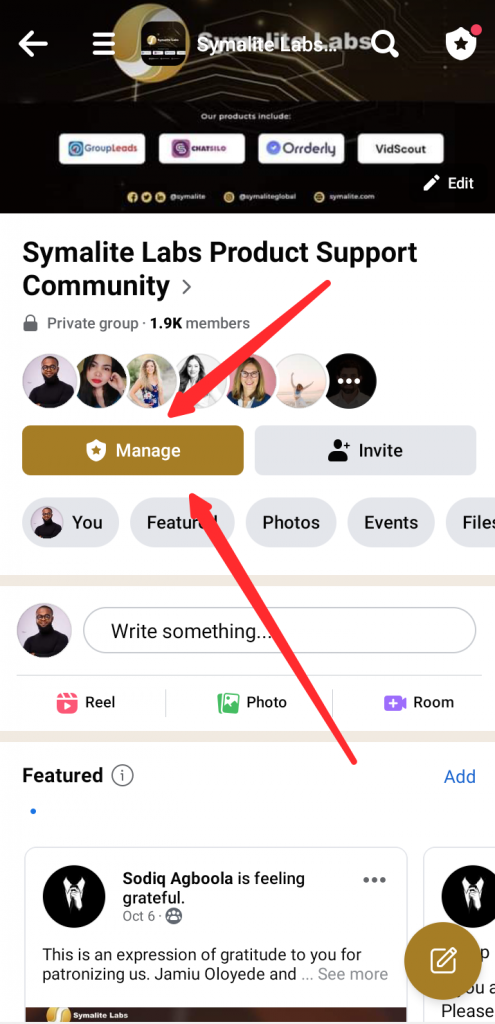
- Next, scroll down to Tool shortcut and click on the “see all tools”
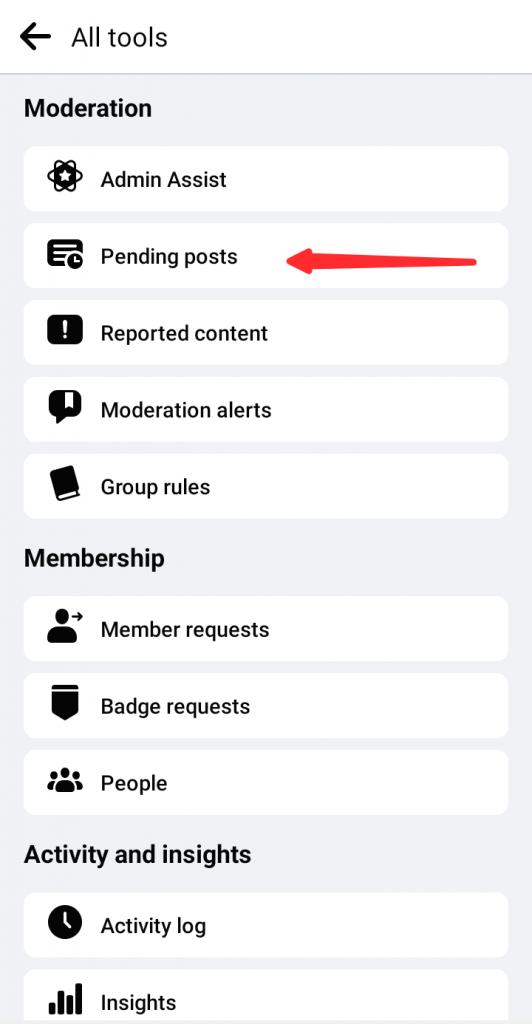
- Access all admin tools as shown below using your mobile
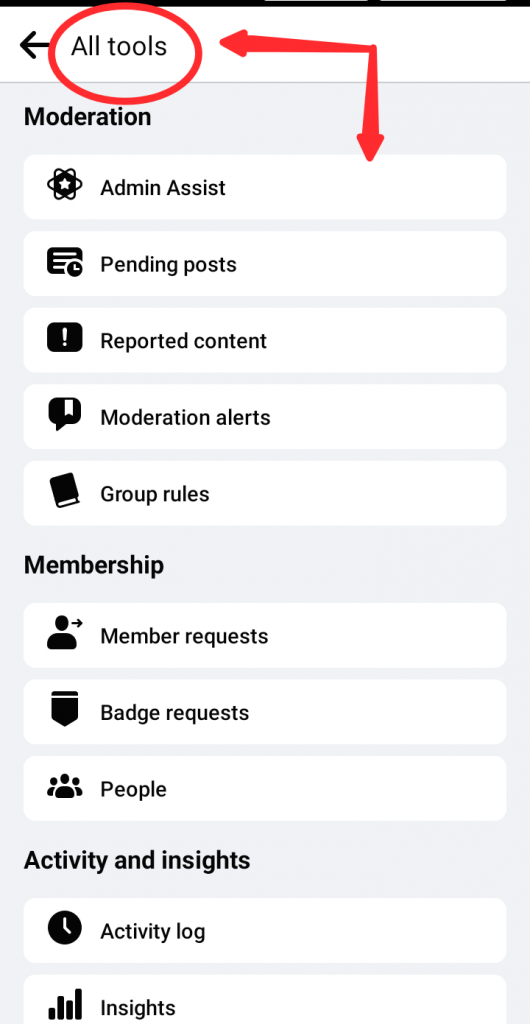
Different Facebook Group Admin Tools and Their Functions
Facebook Group Admin Tools can be divided into four categories.
- Moderation
- Admin Assist
- Pending posts
- Reported content
- Moderation alert
- Group rules
- Membership
- Member request
- Badge request
- People
- Membership questions
- Analytics
- Activity Log
- Insights
- Group Quality
- Grow Group
- Posting
Let’s take a look at the admin tools one by one.
Moderation Admin Tools
1. Admin Assist
If you want to set some criteria to manage posting and participation in your group, then this admin tool is for you.
It acts like your clone to help you manage postings and members’ participation. Hence, the name “admin assist.” Like your AI admin that can do what you do based on rules you give it or criteria you set.
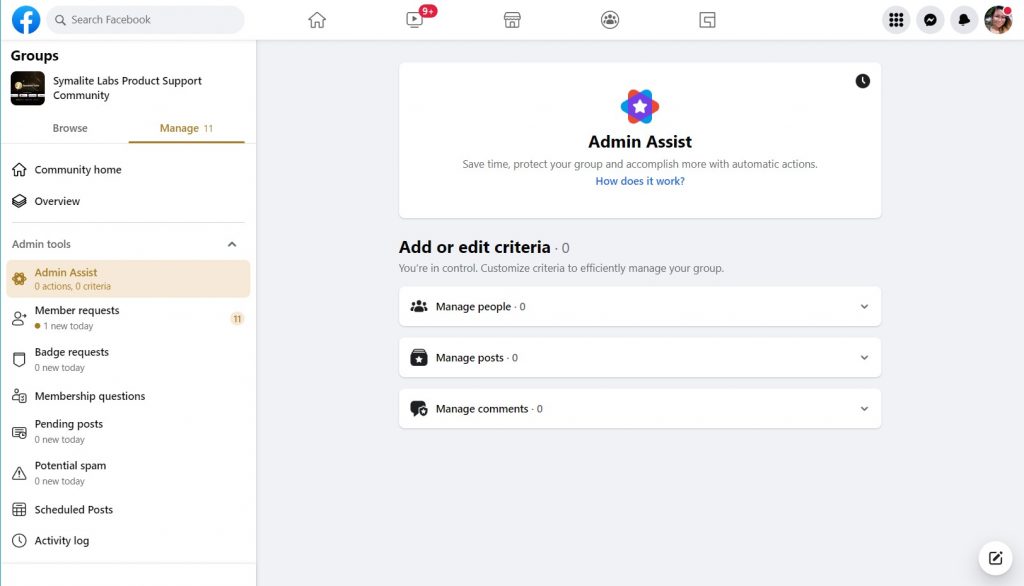
Here are some of the ways Admin Assist can benefit you:
- It can help you approve membership requests from pending members’ who answered the membership questions.
- It can help you manage posts that may contain false or misleading information based on third-party fact-checking software and sites.
- It can help you decline posts from specific users matching certain descriptions you set. For example, users who don’t have profile pictures or users who recently created a Facebook account.
- It can help you detect and decline potential spam.
- It can help you reduce promotional content by auto-declining content containing certain keywords or links.
- It can help you offer feedback to members whose posts have been declined and encourage them to rewrite and resubmit for approval.
- It can help you remove posts or comments that have been reported by others
Finally, using Admin assist, you can also decide to moderate posts and comments made by new members, including visitors, if you’ve converted your group into a new public group.
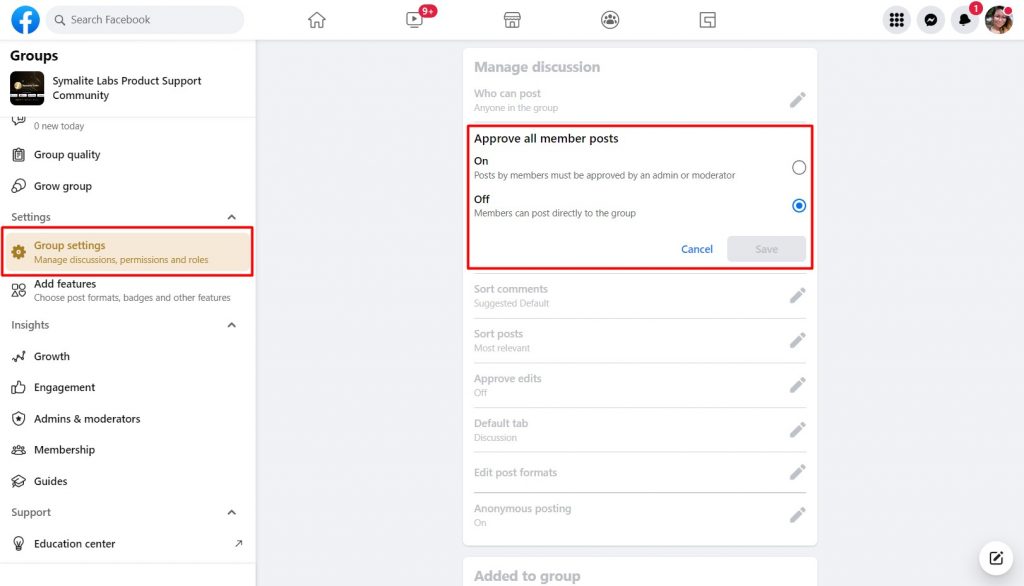
2. Pending Posts
When your members make a new post in your Facebook group, admins and moderators can review it before it goes live.
This can help you keep the group sane and spam-free.
With this admin tool called “Pending Posts,” you’ll be able to see all posting requests from your members. And you can choose to decline them or approve them as you like.
This feature has two settings:
- ON
- Posts by members must be approved by an admin or a moderator.
- OFF
- Members can post directly to the group

How to Turn on Post-approval
1. Select Groups, followed by Your groups, on the top right corner of Facebook, then choose your group. Tap See more if you can’t see the specific group.
2. Tap Settings.
3. Select Post approval from the Manage discussion menu, then select On.
How To Accept or Reject Posts
1. Tap Groups, followed by Your groups, in the top right corner of Facebook, then choose your group. Tap See more if you can’t see Groups.
2. Hit Pending postings twice. Each pending post can then be approved or declined.
By clicking the top of the Screen, unticking any posts you don’t want to be included in the bulk action, and then pressing Approve or Decline, you can approve or reject several pending posts at once.
How to Automatically Moderate the Comments in Your Facebook Group
1. Click on Groups, followed by Your groups, and then choose your group to handle postings automatically. Tap See more if you can’t see Groups.
2. Press the upper right corner.
3. Click on Admin Assist.
4. Select Add beside Decline incoming post if under Manage posts.
5. Choose a pre-set set of criteria and tap Apply Criteria. Alternatively, click See More Options, pick your criteria, and tap Update.
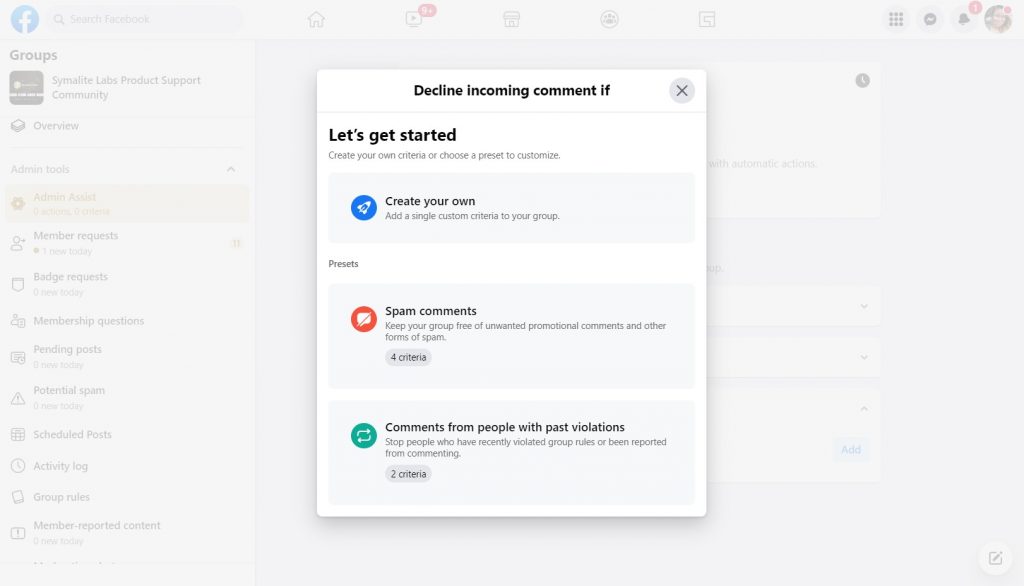
Keep in mind that if any requirements are met, Admin Assist will immediately reject a pending post.
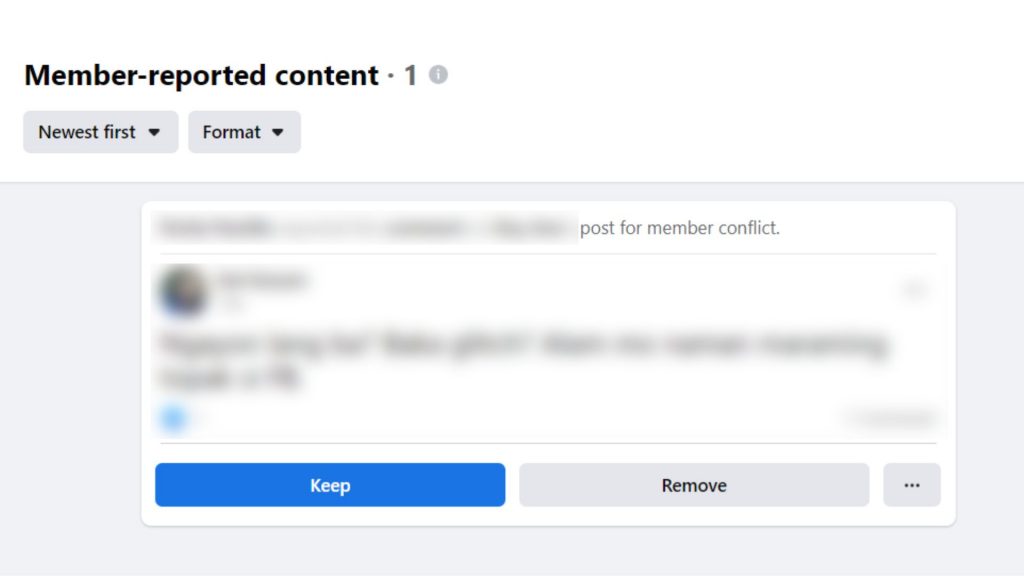
3. Reported Content
This is where you see the content that your members reported. Members can also help you monitor the group by reporting posts and comments to the group admin.
The content may be posts or comments.
The content might be spam, unsolicited, promotional, inappropriate, abusive, discriminative, or violate the group’s rules.
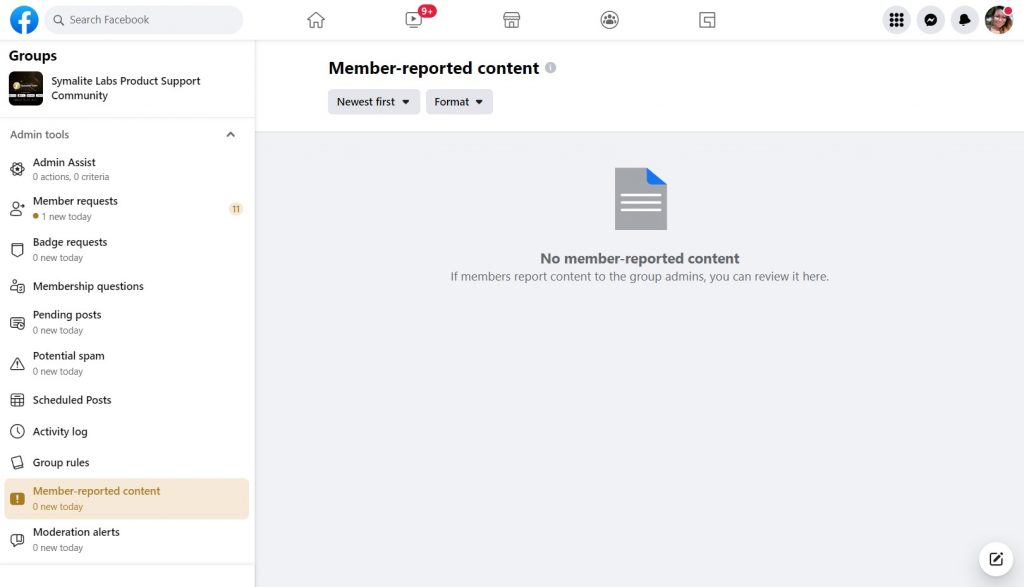
As an admin, you can see all of the reported content under this admin tool.
This is not all. What can you do about them and those who posted them?
You can choose to keep or delete the reported post or comment.
You can also choose to suspend, remove, or block the members who posted it.
4. Moderation Alert
This admin tool can be used when there’s a potential conflict among group members.
It might be a heated argument, content that goes against Facebook community policy, and so on.
When the Facebook algorithm detects such posts or comments, it will alert you to moderate such.
You can also set up moderation alerts to know about posts or comments that need your attention.
Moderation alerts can only be configured by group administrators and moderators.
You’ll be informed when comments or posts in your Facebook group may require your attention when you set up moderation notifications.
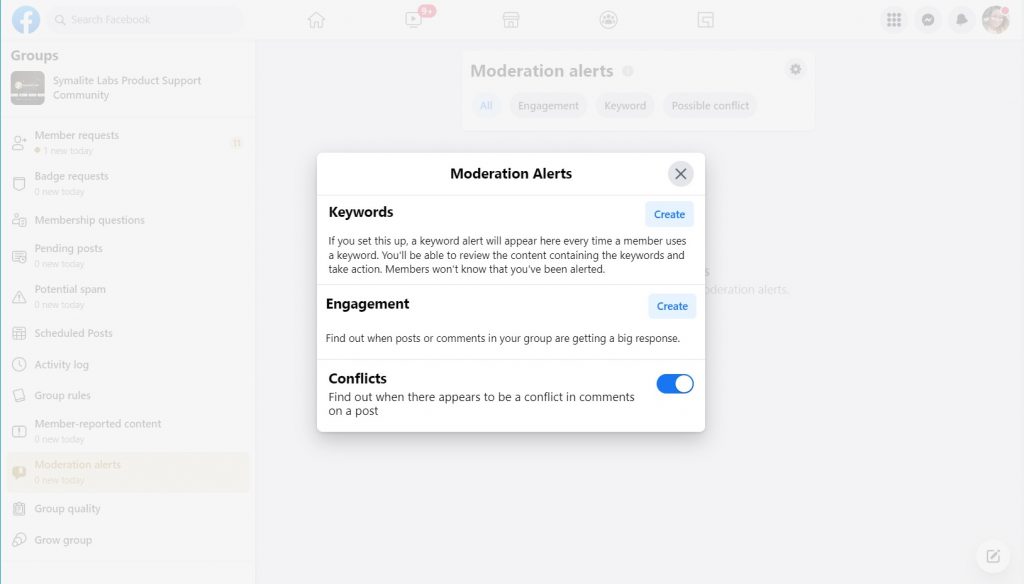
There are three moderation alert types:
Keyword Alerts
This alerts admins when your group members use specific words or expressions using keywords.
You can set this up by including certain keywords. The moderation alert admin tool will notify you when such keywords are used in posts or comments.
Engagement Alerts
This informs you when posts or comments in your group reach a predetermined threshold for likes, shares, or reactions.
Simply put, you can know when certain posts are getting engagement in your Facebook group
Conflict Warnings
Conflict warnings give you the heads up when there may be a disagreement in the comments on a post.
How to Set Up Moderation Alerts
1. Select the Groups button in the top-right corner of Facebook, then choose your group.
2. Choose Moderation alerts, then tap Manage.
3. To ignore keyword and engagement alerts, tap Keep. To remove the content from your group, select Remove.
4. To ignore a conflict alert, tap Keep. To review a potential conflict, tap See post. The content can then be moderated by taking appropriate action, such as suspending someone, labeling a rule, delaying comments, or temporarily restricting someone’s participation in the group.
There are no restrictions on the number of keyword alerts you may add.
Remember that you will only get moderation alerts if your criteria are satisfied within an hour.
5. Group Rules
Once established, group rules are visible in your group’s About section. Once a prospective member requests to join a group that employs membership questions, the group rules will also be shown at the bottom.
When it comes to rule violations, you have the option to inform community members of a specific group rule that was broken when you (or another admin or moderator) remove a post that does not comply with community rules.
If you decide to give feedback, the offending member will get a notification that includes a unique note and the rule that was broken. The message is delivered on behalf of group administrators; it does not identify the particular administrator who took down the post and informed the member.
If you wish your Facebook group to succeed, you need to create rules. These serve as guidelines on how the members should behave inside the community.
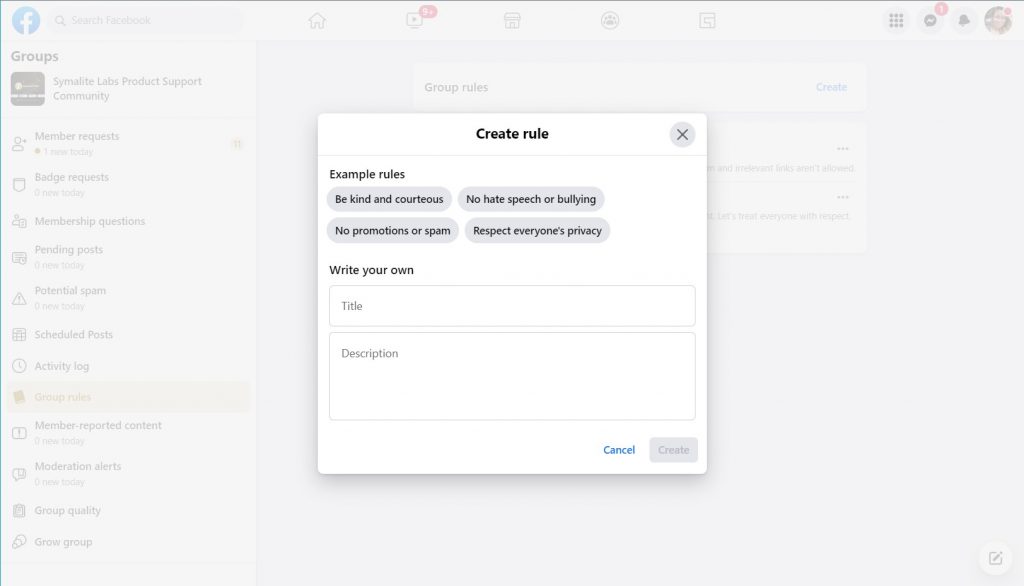
You can set up to 10 rules in your group using this admin tool.
How to Create Rules for Your Facebook Group
- Go to your group’s desktop website.
- Click Moderate Group on the left menu, then choose Create Rules.
- After entering a title and description, click Create Rule.
- To confirm, click.
- Drag and drop the rules into the desired order to change the order in which group rules are presented.
To Change or Delete a Group Rule
- Go to your group’s desktop website.
- Click Moderate Group on the left menu, then choose Create Rules.
- Choose Edit Rule or Delete Rule by clicking on the rule’s right side.
To Notify A Member When You Delete Their Post
- To change the settings for a given post, click on it.
- Choose Delete Post.
- Choose the group rule that the post breaks.
- Optionally provide one more note.
- Decide whether to communicate rules broken and notes with the offending member.
- Select “Remove Post” from the menu.
Only admins have access to create, amend, and rearrange group rules. Both administrators and moderators have the ability to delete a post and choose which group rule the offending member violated.
Membership Admin Tools
6. Member Requests

Under this admin tool, you have access to all membership requests that have been sent by new members.
Here you can choose to approve or decline their membership request. You can also nudge member requests that have not answered the membership questions completely.
In addition, you can approve or decline requests individually for each request sent or you can do it in bulk and “approve all” or “decline all.”
7. Badge Request
Badges are meant to display people’s roles and accomplishments in a group.
It lets people know who you are as a member or an admin of a group.
There are several badges for admins and members alike.
If you earn a badge and you choose to display it on your group profile, it will be seen on your posts, comments, and profile for that group.
Types of Badges You Can Get in a Facebook Group
So, what are the types of badges present in your group?
Here are some of the badges you can use to your advantage as an admin.
| Badge | Who Receives It | How It is Granted | How Long A Member Has the Badge Displayed |
| Admin | This is given to the group creator and group admins. | By becoming an admin through an invitation by another admin. | The admin has the choice of how long the badge is displayed. It remains on display unless it is turned off by an admin for other members in the group or an admin decides not to display it by their name anymore. |
| Moderator | This is given to moderators. | If the person is invited to become a moderator by an admin and he or she accepts the invitation. | Similar to the admin badge, the moderator has the choice of how long the badge is displayed. It remains on display unless it is turned off by an admin for other members in the group or the moderator decides not to display it by their name anymore. |
| Rising Star | This is given to new group members who are actively engaging within their first month of joining the group. | If a member creates and publishes engaging content within the first month of joining the group. | It is displayed for a month unless an admin turns it off before the month ends. |
| Group Expert | It can be offered to admin, moderator or group members who qualify for it. | If a member demonstrates being knowledgeable about topics that the group is interested in, they may be honored with the badge of group expert. | If an admin turns the badge off or if the receiver decides to no longer display it beside their name. |
| New Member | This is automatically displayed on new members. | If a person joins a group. | This is displayed for up to two weeks unless an admin turns it off for the group. |
| Conversation Starter | This is for any group member. | This is given to group members who often create posts that members often engage with. | It is displayed for a month unless an admin turns off this feature. |
| Visual Storyteller | This is offered to any group member. | If a person shares images and videos consistently. | It displays for one month unless an authorized person turns it off. |
| Founding Member | This is offered to group members only. According to Facebook, this badge is only available to groups created after 2018. | This badge is given to the first few members who joined the group. | This is displayed for a month. |
| Considering Parenthood | To all group members and admins alike. | If a member decides to identify as someone considering parenthood. | It is displayed for one month then it can be turned off for the community or the individual can personally turn off the one that appears next to their name. |
| Expecting Parent | To all group members and admins alike. | A member who wishes to identify as someone expecting a child or in the process of adopting one. | Displays for one month unless turned off by an admin or the individual. |
| Experienced Parent | To all group members and admins alike. | A member who wishes to identify as such. | It displays for a month unless turned off. |
| Highly Rated | Group members who identify as a seller. | It’s a badge for sellers who are highly rated in the group. They earn it after receiving at least 4 ratings that are equal to or higher than 4 / 5 stars in the last 30 days. | It displays for a month unless turned off. |
| Very Responsive | All group members who sell. | It’s for sellers who respond within an hour to 80% of messages on listings. | It displays for a month unless turned off. |
| Other Parenting Badges (New Parent, Parent of multiple kids, Parent of young adult, Parent of young kid) | To all group members and admins alike. | It’s available for whoever chooses to identify as such. | It displays for a month unless turned off. |
How to Turn Badges On or Off
1. Go to your group.
2. Select the shield icon in your group and go to group settings.
3. Select Badges below Membership.
4. Select the on or off icon in front of each badge available to display them in your group.
Group members can also choose to turn their individual badges on or off.
How to Add or Remove Badges from Your Facebook Group
Here’s how to add or remove specific badges from your Facebook group.
1. Go to your Facebook home page.
2. Select the shield icon and go to Settings.
3. Scroll down to “Added to group.”
4. Select the badge you want to add to the group.
5. Switch the on and off icon in front to allow or disallow members from displaying the chosen badge.
It’s important you know that some of the badges are earned while others are not.
To see the badges earned, go to settings and turn them on or off.
8. People
This is where you can find new people or pages who joined your group.
Keep in mind that when Pages join private groups, anyone in charge of the Page can view the members of those groups.
As for visibility, the member lists of public groups are visible to everyone on Facebook. For private groups, you need to be a member in order to view the member list.
Here is how to view the member list:
1. On Facebook, tap Groups, followed by Your groups, and then select your group to view the member list. Tap See more if you can’t see Groups.
2. Tap the group’s name, then select Members (for private groups) or People (for public groups) from the drop-down menu and tap See all.
As individuals and Pages join and depart the group, the member list will automatically update.
9. Membership Questions
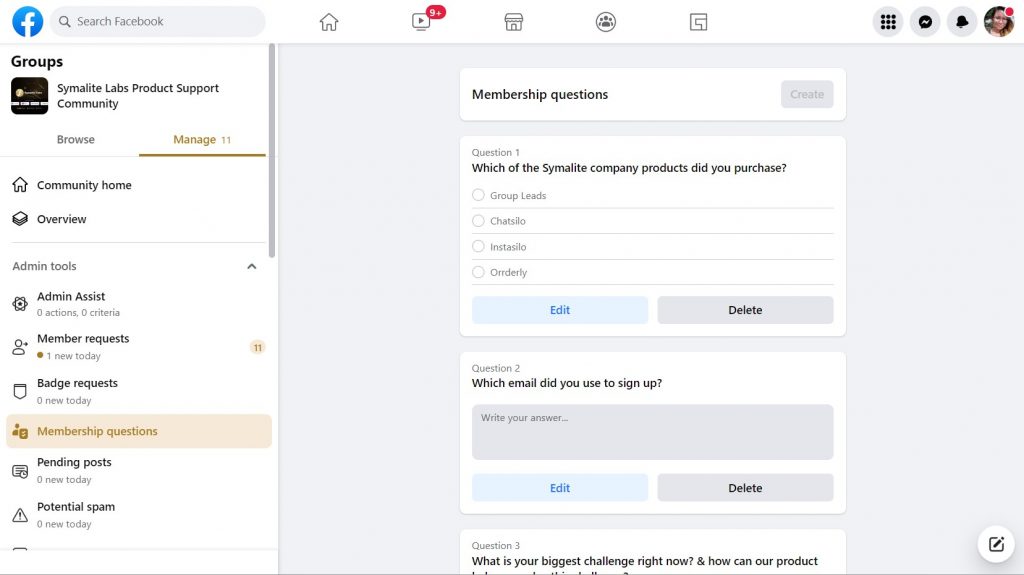
This doesn’t display in all groups by default. This pops up once a person requests access to the group.
Membership questions are a great way to filter incoming member requests. It is also an opportunity to do market research.
You can read this detailed guide we wrote about membership questions to use it to your advantage as an admin.
Activity and Insights
10. Activity Log
This is where you check for the history of activities made by admins in the group.
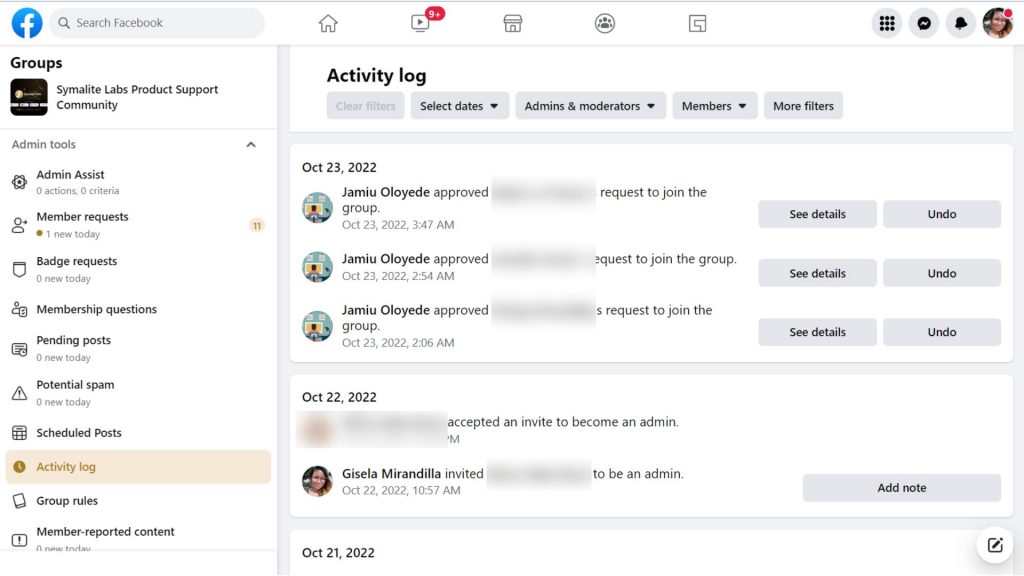
If an admin invited a member to become an admin, you’ll see. If an admin approves someone’s membership request, you’ll see it here. And so much more.
11. Insights
This is where you see important analytics about your group’s growth, engagement, a summary on admin and moderator activity, and membership.
You can see how well your group is doing and where your group members are from. You can see members’ top countries, top cities, etc. You can also see the top contributors to your group.
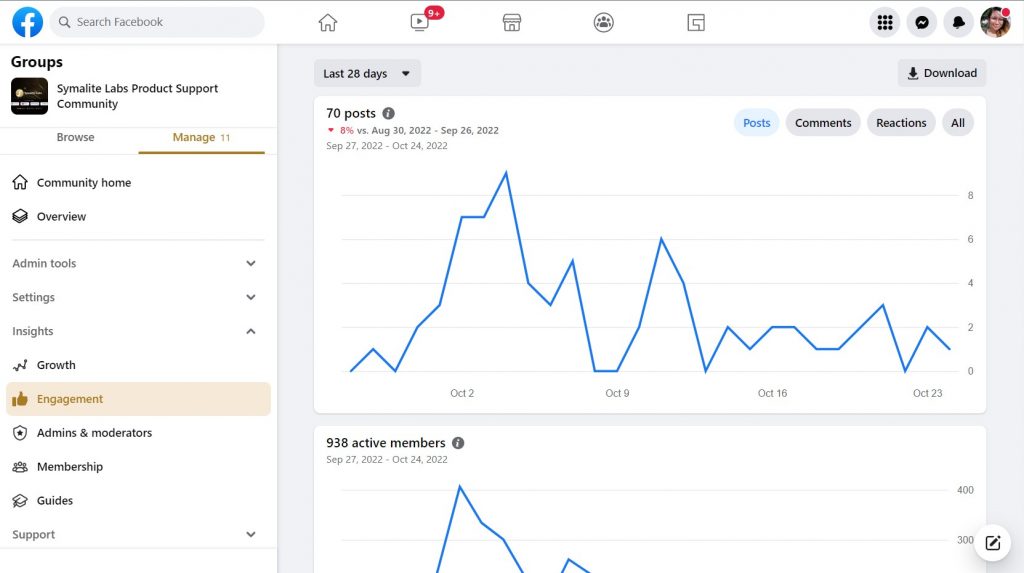
From the data Insights provide, you can infer how to improve your group further.
12. Group Quality
This is where you see the health of your group. You can see if your group has violated any Facebook community standards. It’s important to check it often to ensure you’re always in good standing. Under this Facebook admin tool, you can access two more tools.
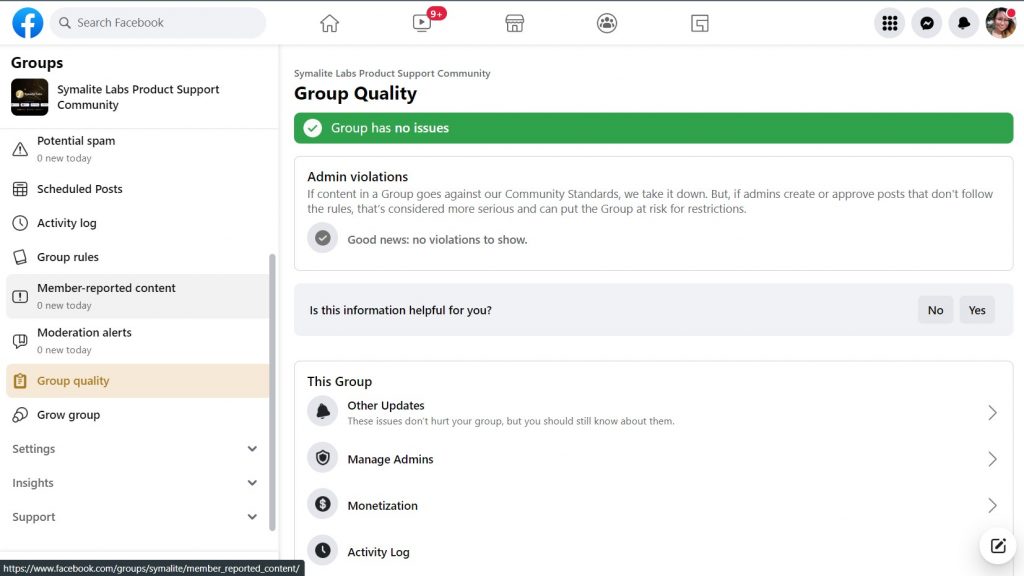
- Other Updates: Here you can see important updates about issues that can hurt your group.
- Manage Admin: Here, you can promote, demote, ban, block or remove someone from your group. You should check this admin tool out to effectively manage your Facebook group.
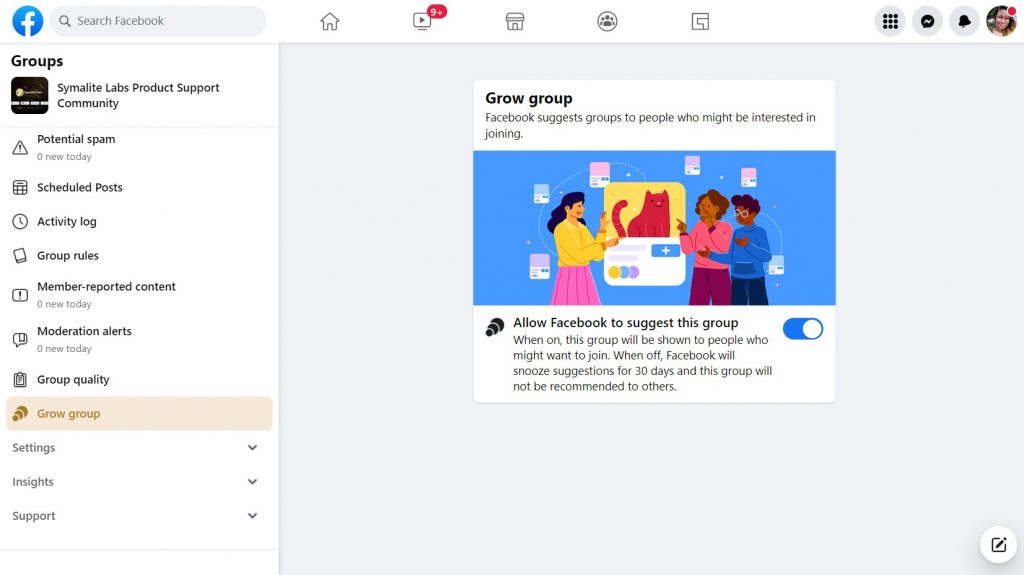
13. Grow Group
Under this admin tool, if you want Facebook to suggest your group to people, simply turn it on. Facebook will send a prompt to ask if you want to turn it on or off. If you choose off, Facebook will snooze the reminder for another 30 days. If your group isn’t private, not specific to your customers and you want to grow it as quickly as possible, then I highly recommend you turn it on.
Posting
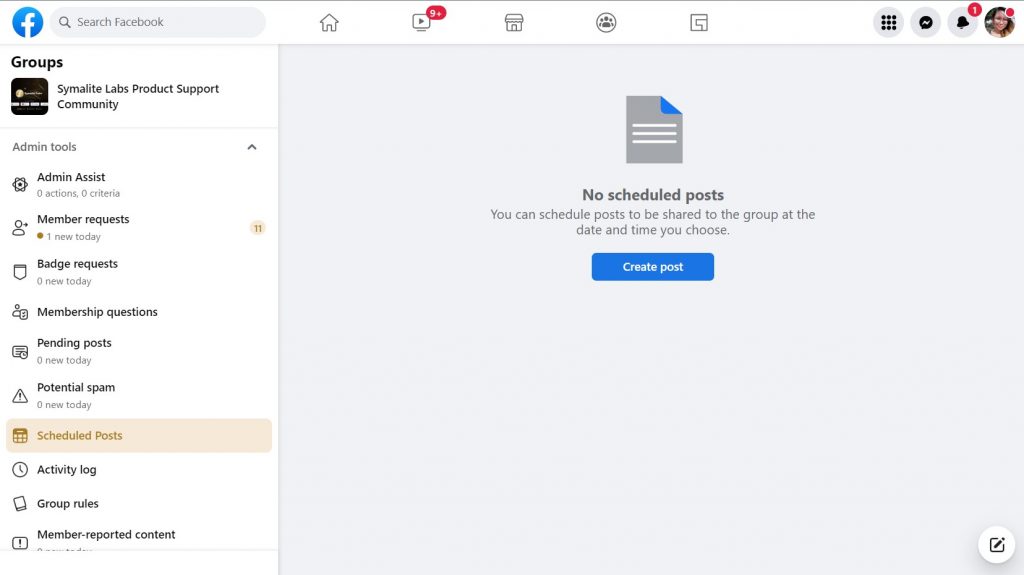
14. Scheduled Post
If you want to schedule a post to be published automatically later, use this Facebook admin tool called Scheduled post.
How to Schedule a Post to Your Facebook Group
1. Tap Groups, followed by Your groups, in the bottom right corner of Facebook, then choose your group. Tap See more if you can’t see Groups.
2. At the top of your group, begin writing your post.
3. Tap Timetable.
4. Decide on the day and hour you want the post to go live.
5. On the upper right, click Save.
6. Click schedule.
How to Manage Scheduled Posts in a Facebook Group
To modify, delete, or reschedule a scheduled post:
1. Tap Groups, followed by Your groups, in the bottom right corner of Facebook, then choose your group. Tap See more if you can’t see Groups.
2. Tap the upper right corner and choose Scheduled posts.
3. Tap Edit post or Delete next to the post you wish to change.
Final Thoughts
There you have them. Those are the Facebook group admin tools that you should know about. Explore them and use them to grow and manage your Facebook group successfully.